Mega-lab for network automation in GNS3 + Ansible + Python/Asyncio + Nornir - Part 1
Updated:
This is the first post of a series on setting up an Mega-lab for Network Automation in GNS3 with around 1000 devices in the network, thanks to Dmitry Figol and his Network Automation marathon. To set up a big lab, we need to automate as much as possible all the steps. For example, we have to setup SSH key on each device so that we can connect to it using different management platforms, including Ansible, Python netmiko, Nornir. It would be very a heavy task if we have to set up the SSH key manually on 1000 routers. Also, the configurations of IP addresses for all devices are tedious considering a huge number of devices. A good solution would involve the use of a DHCP server to assign IP address for each device automatically when it starts up.
We will go through the following steps using Zero-Touch Provisioning (ZTP) approach. Zero-touch provisioning promises that you can install new devices without moving your hands. To someone who is used to connecting a console cable to each and every device, this can seem like wondrous magic. The process of installing a new device with ZTP instead of doing the same thing manually is a breeze. One thing that a lot of people forget about this process is that all the hard work lies in the preparation. A very good reference on ZTP can be found here.
1. Topology design
We set up the topology with the following details in mind.
- Networks:
- Host-only: VMnet1 - 192.168.134.0/24
- NAT: VMnet8 - 192.168.100.0/24
- Ubuntu-desktop-control-station:
- Connect to VMnet1 at 192.168.134.130
- Connect to VMnet8 at 192.168.100.147
- GNS3:
- Router image: i86bi-linux-l3-adventerprisek9-15.5.2T
- The startup-config is here
- Note: this startup-config has to be copied in 2 folders in order to work.
- In the host machine: C:\Users\kimdo\GNS3\configs\mega-lab-router.txt (kimdo is my computer name).
- In the GNS3 vm: /GNS3/projects/
- IP Adressing:
Our goal is to automate the Zero Touch Provision to bring up the lab, as can be seen in the following demo.
- Automatically add routers to the topology using GNS3 APIs.
- Set up the DHCP server, so that when each router is added and started up, it will receive an assigned IP address based on router name, and where it is connected in the network.

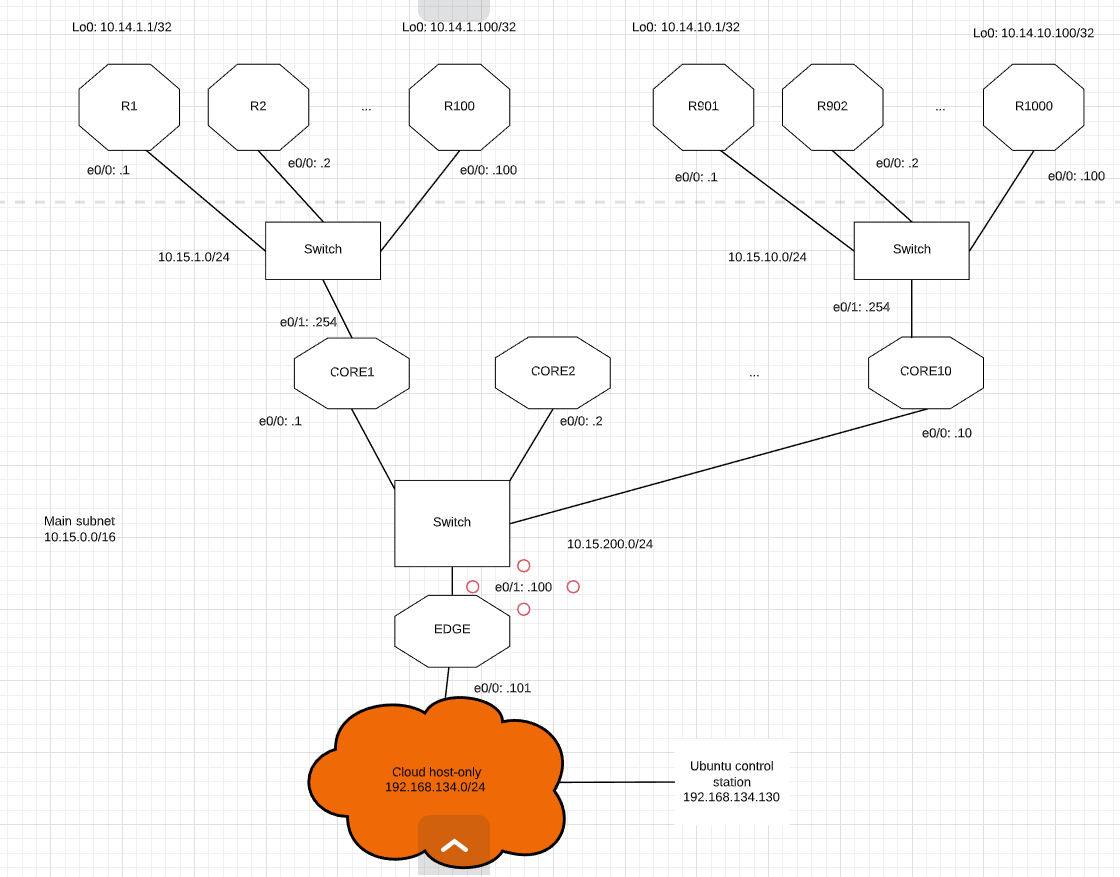
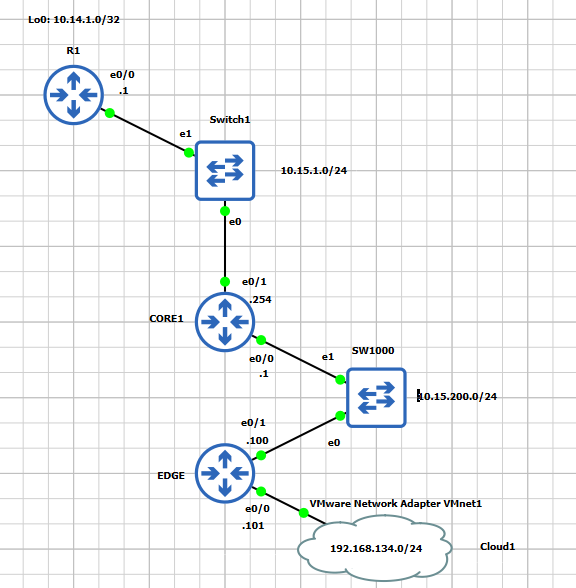
1.1. Define the initial topology
The topology is defined as in figure below.
The topology is built with three layers: ACCESS, CORE, and EDGE.
Configure EDGE router
The steps are as follow:
- Generate RSA key for ssh connection
- config e0/0: 192.168.134.101
- config e0/1: 10.15.200.100
- config lo0: 10.13.100.100/32
- config EIGRP:
conf t
router eigrp 100
network 10.0.0.0
- Add static route and redistribute under EIGRP
ip route 0.0.0.0 0.0.0.0 192.168.134.100
router eigrp 100
redistribute static metric 1000 10 255 1 1500
Configure CORE1 router
The steps are as follow:
- Generate RSA key for ssh connection
- config e0/0: 10.15.200.1
- config e0/1: 10.15.1.254
- config lo0: 10.13.1.1/32
- config EIGRP
conf t
router eigrp 100
network 10.0.0.0
Configure R1
The steps are as follow:
- Generate RSA key for ssh connection
- config e0/0: 10.15.1.1
- config lo0: 10.14.1.1/32
- config EIGRP
conf t
router eigrp 100
network 10.0.0.0
Add static route in the Ubuntu control station
sudo ip route add 10.0.0.0/8 via 192.168.134.101
1.2. Extend the initial topology
Set up DHCP server on CORE1 (may be not work)
- Set up a DHCP pool, example here.
service dhcp
 ip dhcp pool 1
  network 10.15.1.0 /24
  default-router 10.15.1.254
- Check the DHCP binding with
sh ip dhcp binding. - This solution does not work when allocate new router DHCP based on router name. NEED another solution!!!
Set up DHCP server on Ubuntu-control-station
- Using isc-dhcp-server.
- Install with
apt install -y isc-dhcp-server. - Configure to listen on the interface
ens38(192.168.134.130) in/etc/default/isc-dhcp-server. - Define domain name, DHCP server IP address and gateway IP address in
/etc/dhcp/dhcpd.conf.
option domain-name "lab.doanh";
option domain-name-servers 192.168.134.1;

subnet 192.168.134.0 netmask 255.255.255.0 {
}

class "R2" {
  match if (option host-name = "R2");
}

subnet 10.15.1.0 netmask 255.255.255.0 {
  option routers 10.15.1.254;
  option subnet-mask 255.255.255.0;

  pool {
    allow members of "R2";
    range 10.15.1.2 10.15.1.2;
  }
}
- Run isc-dhcp-server
systemctl enable isc-dhcp-server
systemctl restart isc-dhcp-server
Set up the ip helper-address on CORE1
- Delete the dhcp pool created
ip dhcp pool 1.
conf t
no ip dhcp pool 1
- Setup ip helper address
conf t
int e0/1
ip helper-address 192.168.134.130
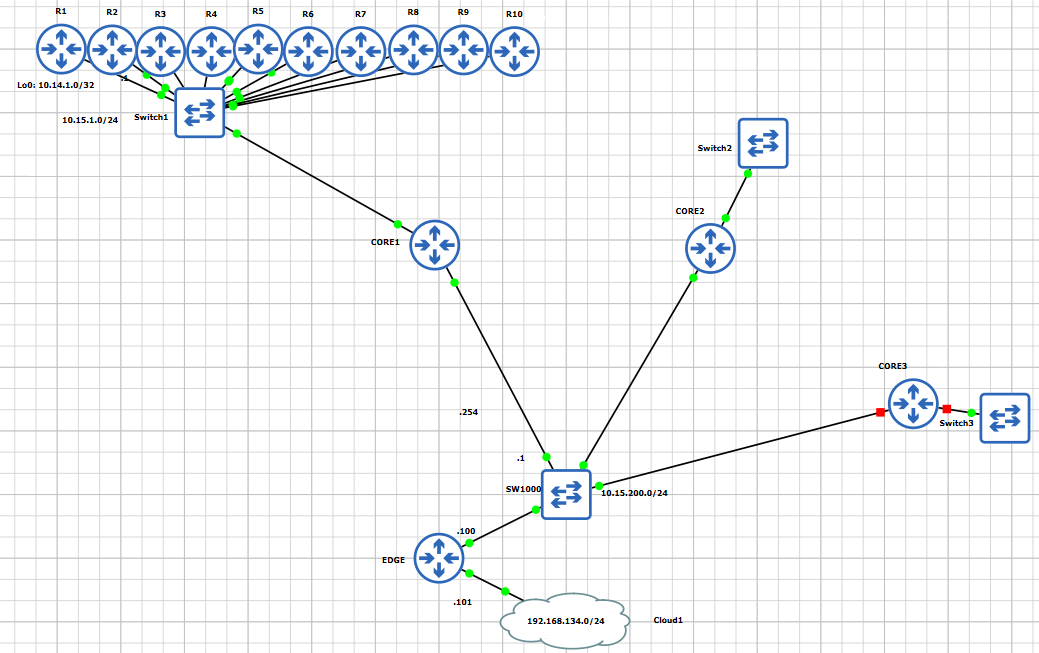
Adding more routers to the topology
The topology as follow:
- Update domain name, DHCP server IP address and gateway IP address in
/etc/dhcp/dhcpd.conf.- The full configuration is here
- Start the routers from R3 to R10, and check the ip address of each
router.
- R3 should have ip
10.15.1.3. - R4 should have ip
10.15.1.4. - R5 should have ip
10.15.1.5. - …
- R3 should have ip
Comments