Nornir 3.0 app: Fastcli for auto-config of interfaces, OSPF, BGP, EIGRP, RIP
Updated:
I am having a passion for Network Automation and DevNet. Since I want to lab every day in GNS3 or EVE-NG, I am committed to automating all of the repetitive tasks such as interfaces configuration, OSPF, EIGRP, BGP routing configurations. I watched the training material from the well-known Khawar Butt (that is available on RouterGods YouTube channel) to be sure about the best practices. I followed along with his videos and rebuilt the labs in EVE-NG. However, when he brought up the lab with the interfaces already configured (like ten interfaces, including Loopbacks), I didn’t want to configure that manually, imagine to do the same for ten routers.
So, I decided to build a CLI tool powered by Nornir 3.0. This practice will help me not only in fastening the process of spinning up the lab but also in learning Nornir 3.0.
The CLI tool named fastcli. I posted it on Twitter, submitted it to DevNet CodeExchange,
and people are kind of like it.

The examples of the topologies for configurations in this exercise are as follows:
1. Fastcli - A tool for network configuration - Nornir 3.0
You can find the original code on my GitHub repo fastcli.
This public repo contains python codes of a CLI tool, called fastcli, for automatically generation of configuration commands and send these commands to the network. The current version supports the commands for interfaces configuration, OSPF, EIGRP, RIP and BGP configurations.
The environment is pre-configured for setting the BGP configuration of topology 1, under inventory/bgp folder.
You can change the topology to be configured by change the variable in the constants.py file.
config_file = "inventory/bgp/config.yaml"
A zip file EVE-NG-topologies.zip that contains 2 network topologies for testing purpose is attached.
1.1. Initializing Nornir and Inventory
The inventory/bgp folder contains the following files described the desired state of the network, including:
- config.yaml
- defaults.yaml
- groups.yaml
- hosts.yaml
There is the tutorial from Nornir website that we need to understand about initializing Nornir, inventory.
groups.yaml
---
###### Routing Groups ######
eigrp:
  data:
    routing: eigrp
ospf:
  data:
    routing: ospf
rip:
  data:
    routing: rip
bgp:
  data:
    routing: bgp
ibgp:
  data:
    routing: ibgp
###### Platform Groups ######
ios:
  platform: ios
  connection_options:
    netmiko:
      platform: cisco_ios
      extras: {}
    napalm:
      extras:
        optional_args: {}
hosts.yaml
Example of hosts.yaml file for Topology 1: BGP and EIGRP configuration
---
R1:
    hostname: 192.168.65.151
    groups:
        - bgp
        - ibgp
        - eigrp
    data:
        # interfaces: {name: interface ip address, ...}
        interfaces: {"e0/0": "192.1.12.1/24", "e0/1": "192.1.13.1/24",
                     "s1/0": "192.1.14.1/24", "s1/1": "192.1.17.1/24",
                     "lo0": "1.1.1.1/8", "lo1": "11.11.11.11/24",
                     "lo11": "10.1.1.1/24"}
        asn: 1000
        bgp_advertised: ['1.0.0.0/8', "11.11.11.0/24"]
        # bgp_neighbors: {"remote-as": ["list of remote AS's ip address"], ...}
        bgp_neighbors: {"400": ["192.1.14.4"], "700": ["192.1.17.7"]}
        # ibgp_neighbors: {"remote-as": ["list of remote AS's ip address"], ...}
        ibgp_neighbors: {"1000": ["10.2.2.2"]}
        # ibgp_update_source: {"update_source": ["list of remote AS's ip address"], ...}
        ibgp_update_source: {"lo11": ["10.2.2.2"]}
        eigrp_advertised: {"100": ["192.1.12.0/24", "192.1.13.0/24", "10.0.0.0/8"]}

R2:
    hostname: 192.168.65.152
    groups:
        - bgp
        - ibgp
        - eigrp
    data:
        interfaces: {"e0/0": "192.1.12.2/24", "e0/1": "192.1.23.2/24",
                     "s1/0": "192.1.25.2/24",
                     "lo0": "2.2.2.2/8", "lo11": "10.2.2.2/24"}
        asn: 1000
        bgp_advertised: ['2.0.0.0/8']
        # bgp_neighbors: {"remote-as": ["list of remote AS's ip address"], ...}
        bgp_neighbors: {"500": ["192.1.25.5"]}
        # ibgp_neighbors: {"remote-as": ["list of remote AS's ip address"], ...}
        ibgp_neighbors: {"1000": ["10.1.1.1", "10.3.3.3"]}
        # ibgp_update_source: {"update_source": ["list of remote AS's ip address"], ...}
        ibgp_update_source: {"lo11": ["10.1.1.1", "10.3.3.3"]}
        eigrp_advertised: {"100": ["192.1.12.0/24", "192.1.23.0/24", "10.0.0.0/8"]}
        route_relector_clients: ["10.1.1.1", "10.3.3.3"]
1.2. Fastcli workflow
The workflow is:
- Defined the configuration information in
hosts.yaml, including:- List of interfaces and IP addresses of each device
- OSPF, BGP, EIGRP information
- Run the configuration command
fastcli interfaces configure, orfastcli bgp configure. - Commands will be automatically generated and sent to each device.
- Confirm the configuration with
fastcli show facts --command "sh ip int br", orfastcli show facts --command "sh ip bgp".
1.3. Some commands supported
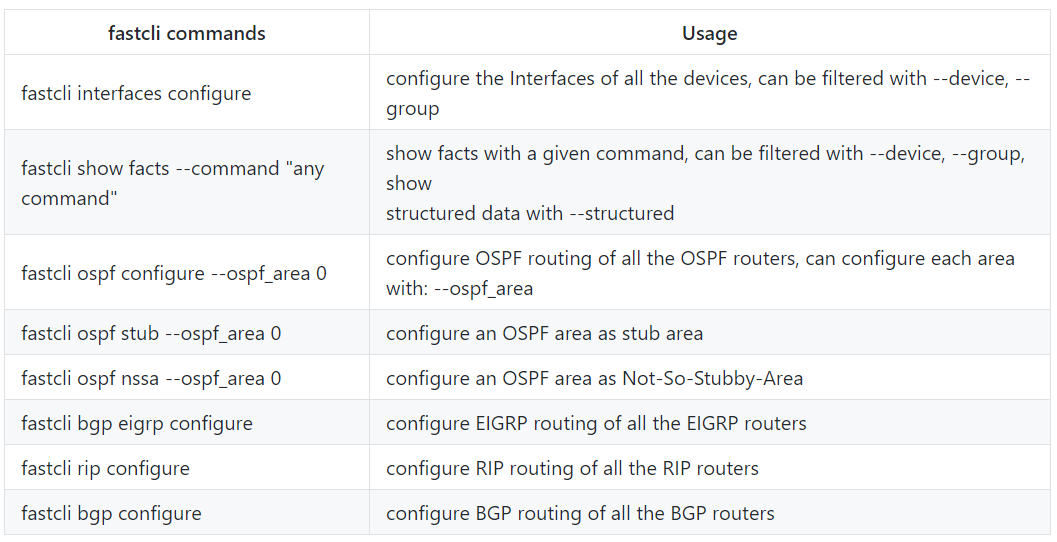
You can run fastcli to see which commands it is currently supported:
fastcli
Usage: fastcli [OPTIONS] COMMAND [ARGS]...

  CLI tool for fast configuration of the network, powerd by Nornir 3.0.

Options:
  --help  Show this message and exit.

Commands:
  bgp         Command for BGP configuration
  eigrp       Command for EIGRP configuration
  interfaces  Command for interfaces configuration
  ospf        Commands for OSPF configuration
  rip         Command for RIP configuration
  show        Get information from all devices [], filtered by name or group
And for each command, it supports some subcommands, for example, ospf command:
fastcli ospf
Usage: fastcli ospf [OPTIONS] COMMAND [ARGS]...

  Commands for OSPF configuration

Options:
  --help  Show this message and exit.

Commands:
  configure  Configure OSPF from the information defined in hosts.yaml
  nssa       Configure an OSPF area as Not-So-Stubby-Area
  stub       Configure an OSPF area as stub area
You can access the help of each subcommand to know about the arguments using fastcli {command} {subcommand} --help, for example:
fastcli ospf configure --help
Usage: fastcli ospf configure [OPTIONS]

  Configure OSPF from the information defined in hosts.yaml

Options:
  --device TEXT  Configure only the device
  --group TEXT   Configure all devices belong to the group  [default: ospf]
  --help         Show this message and exit.
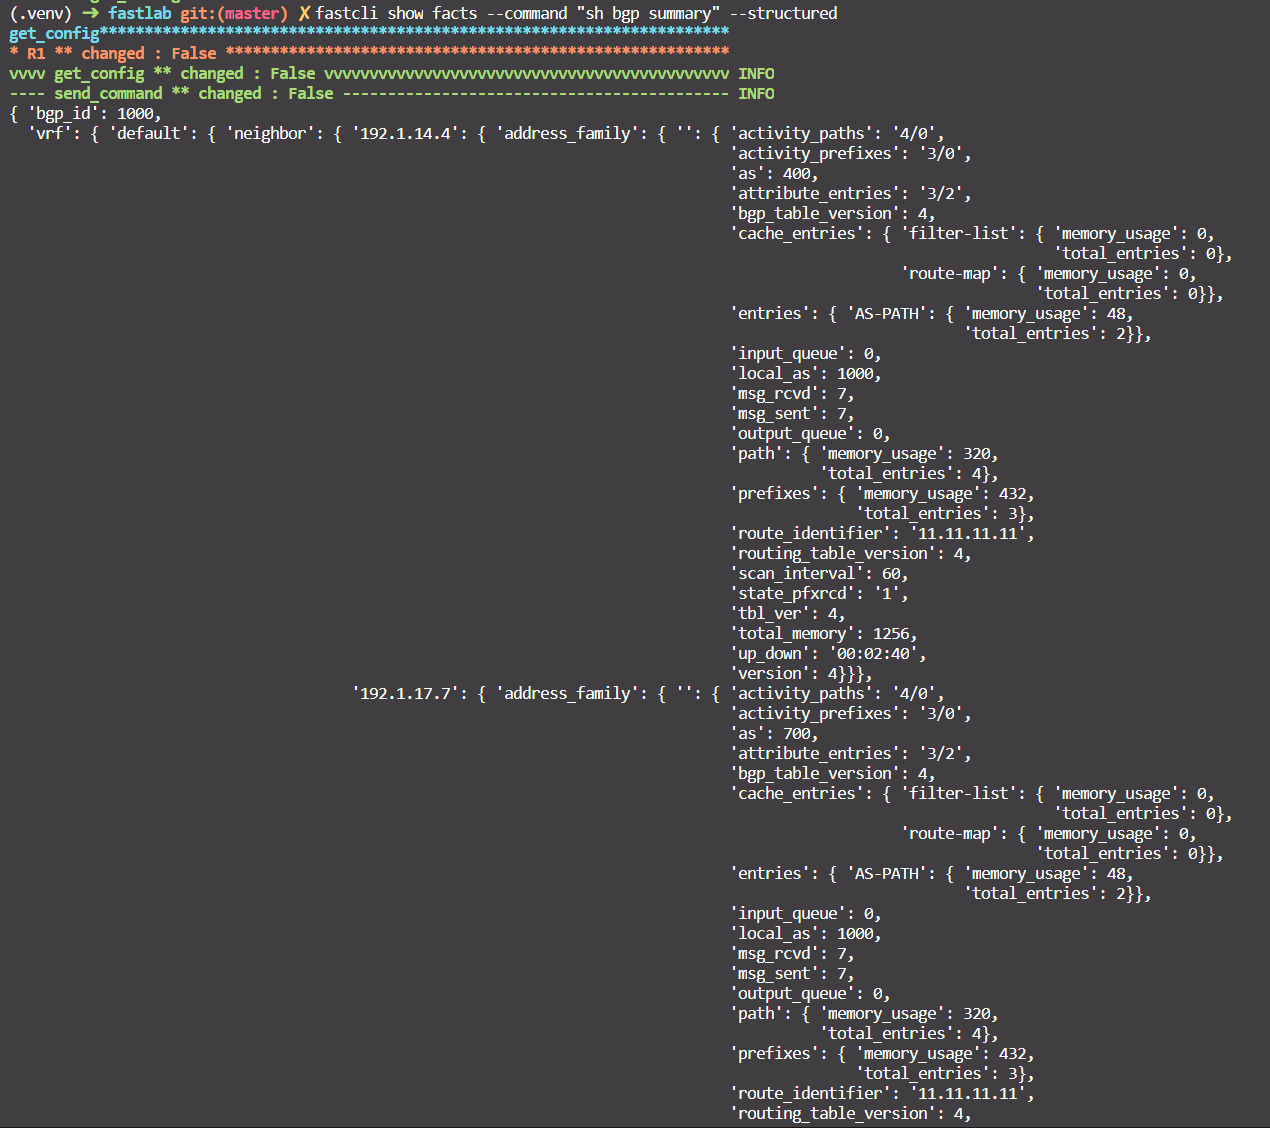
One thing I feel good about this tool is that I can automatically parse the output of
show facts command with the option --structured. Many thanks to Carl Montanari
with his beautiful function print_structured_result.
For example fastcli show facts --command "sh bgp summmary" --structured
Or another example fastcli show facts --command "sh version" --structured
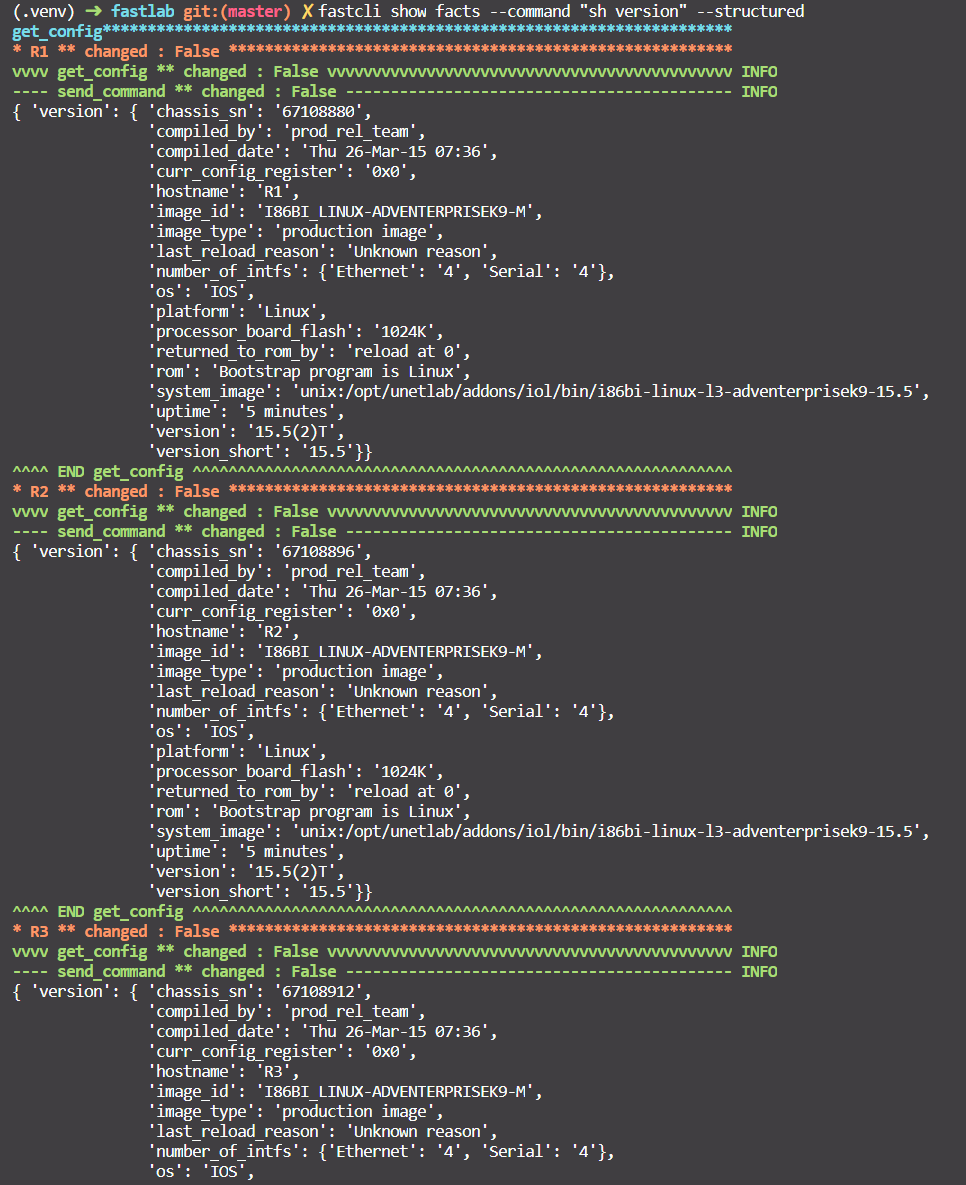
You can show it as a table also. Note that: For table, only sh version is working.

2. Requirements and Setup
2.1. Requirements
To use this code you will need:
- Python 3.8+
- A network with SSH connection setup of all devices.
2.2. Install and Setup
Clone the code to local machine.
git clone https://github.com/kimdoanh89/fastcli
cd fastcli
Setup Python Virtual Environment (requires Python 3.8+)
python3.8 -m venv venv
source venv/bin/activate
pip install --editable .
The variable config_file in constants.py file needs to be configured before running depends on where you
keep your config file.
3. Example topologies
3.1. Topology 1: BGP configuration
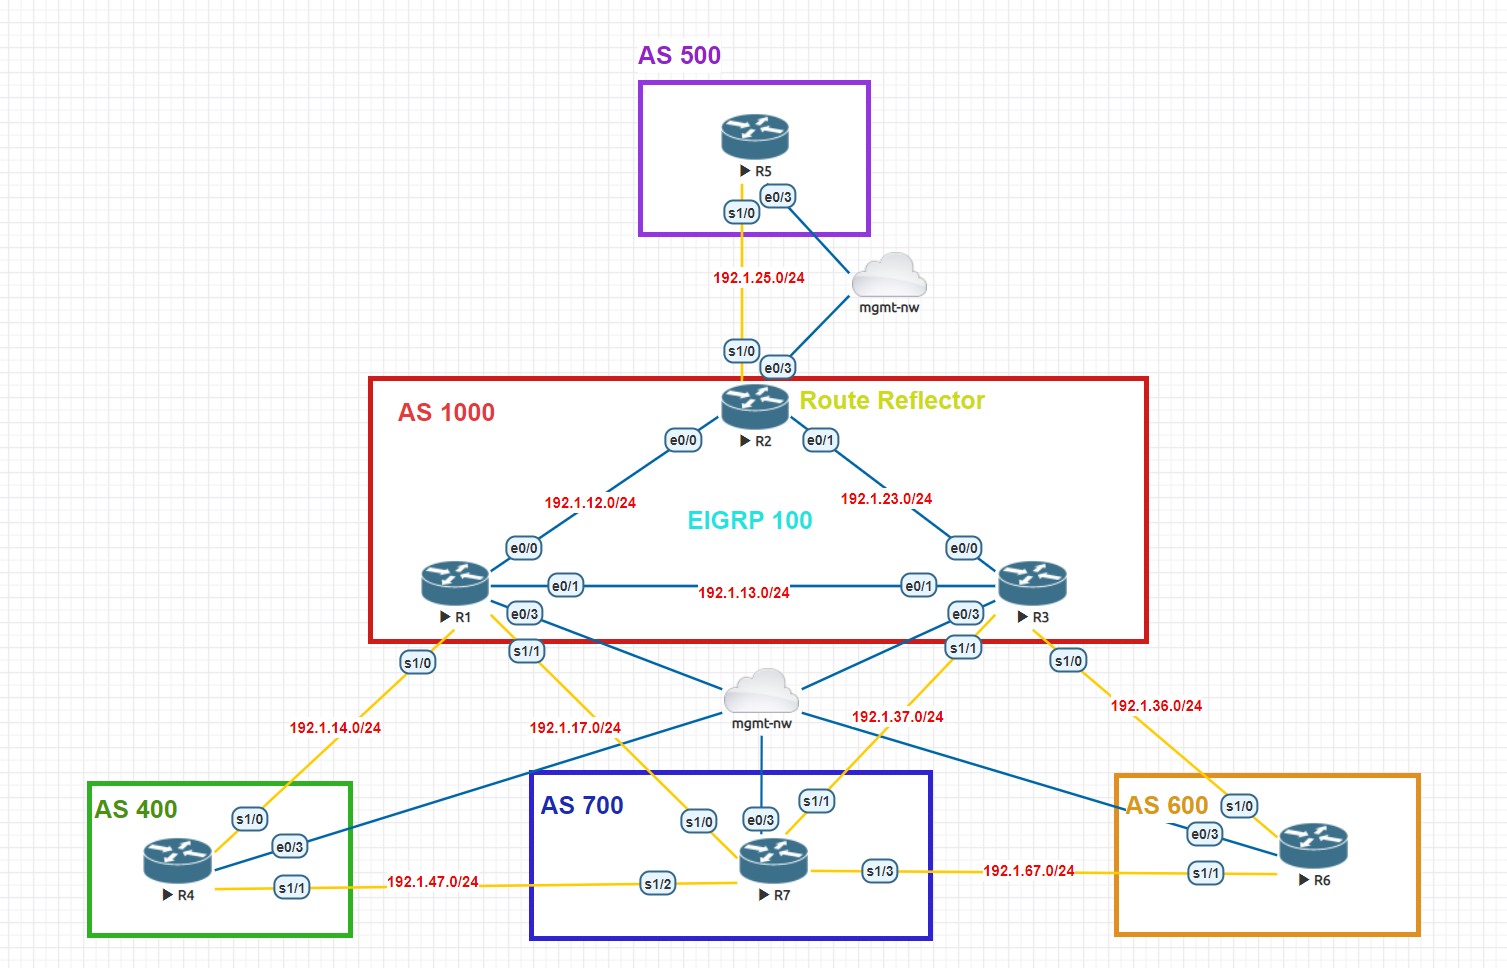
Configuration files under inventory/bgp folder.
Steps:
- Check the config_file variable in
constants.pyconfig_file = "inventory/bgp/config.yaml" - Check the paths of
host_file,group_file,defaults_fileinconfig.yaml. - Define configurations in
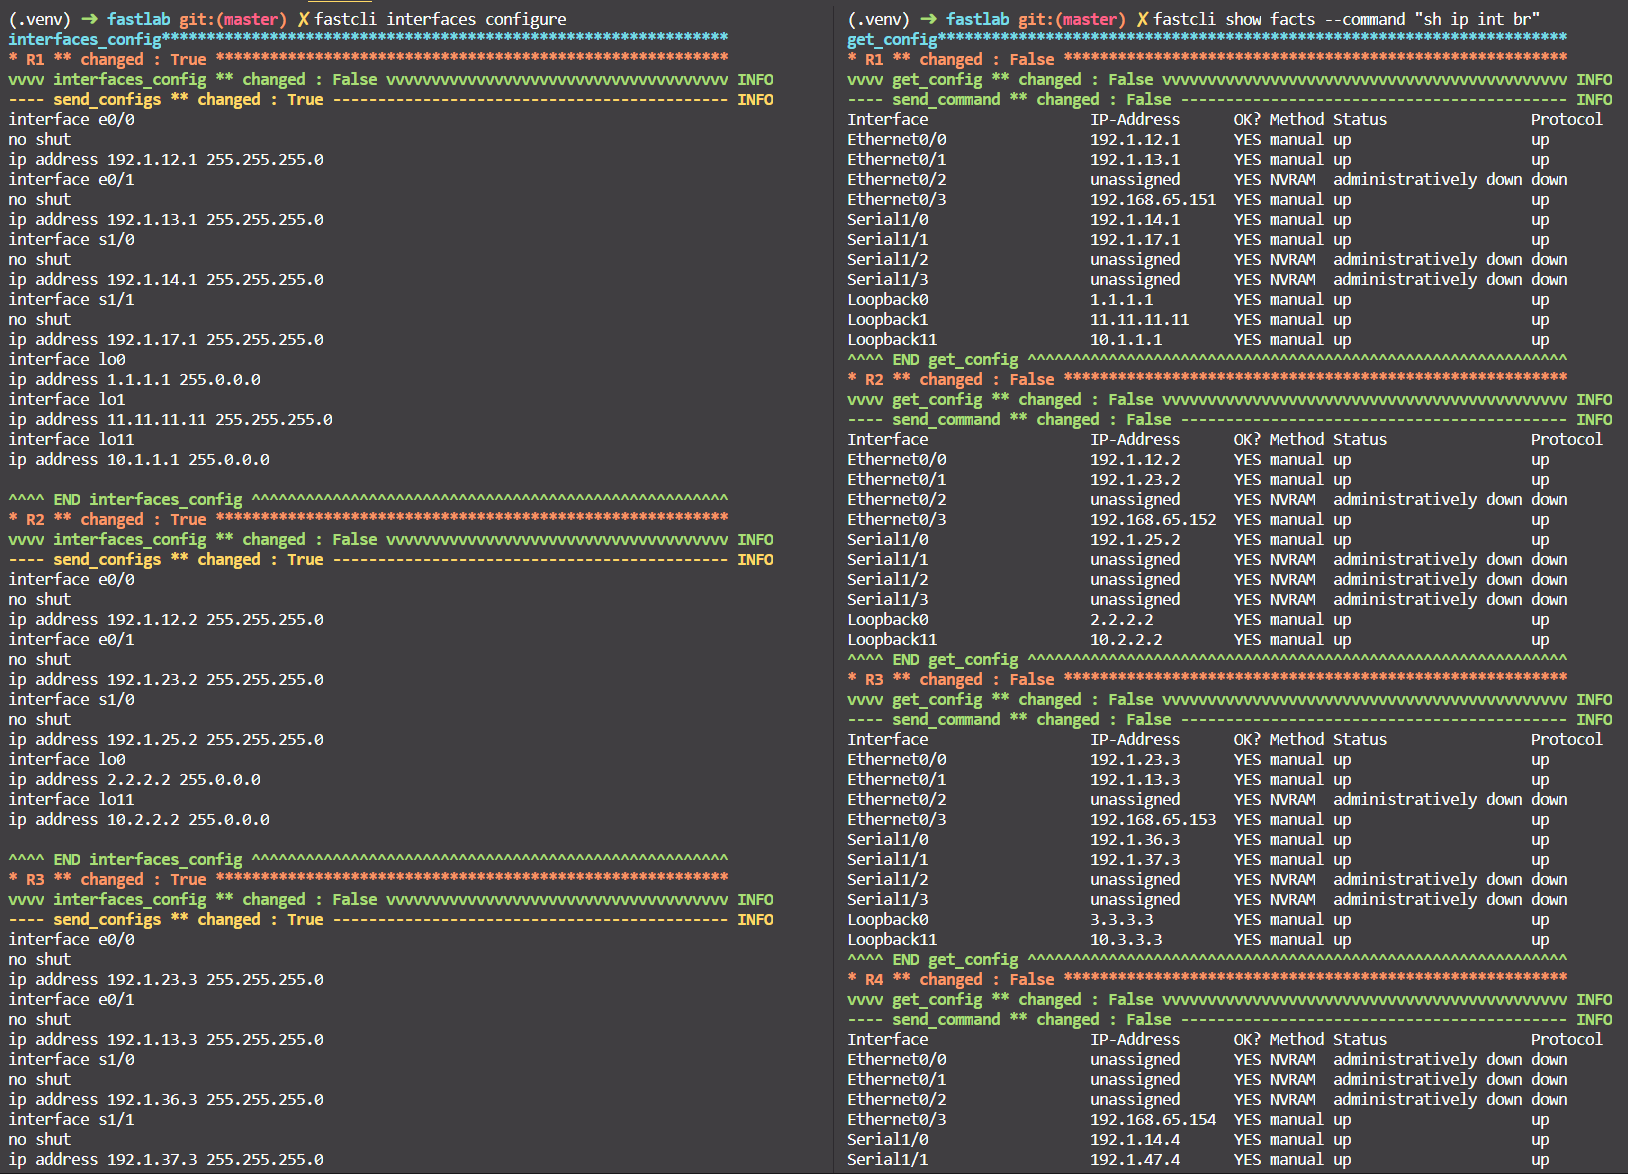
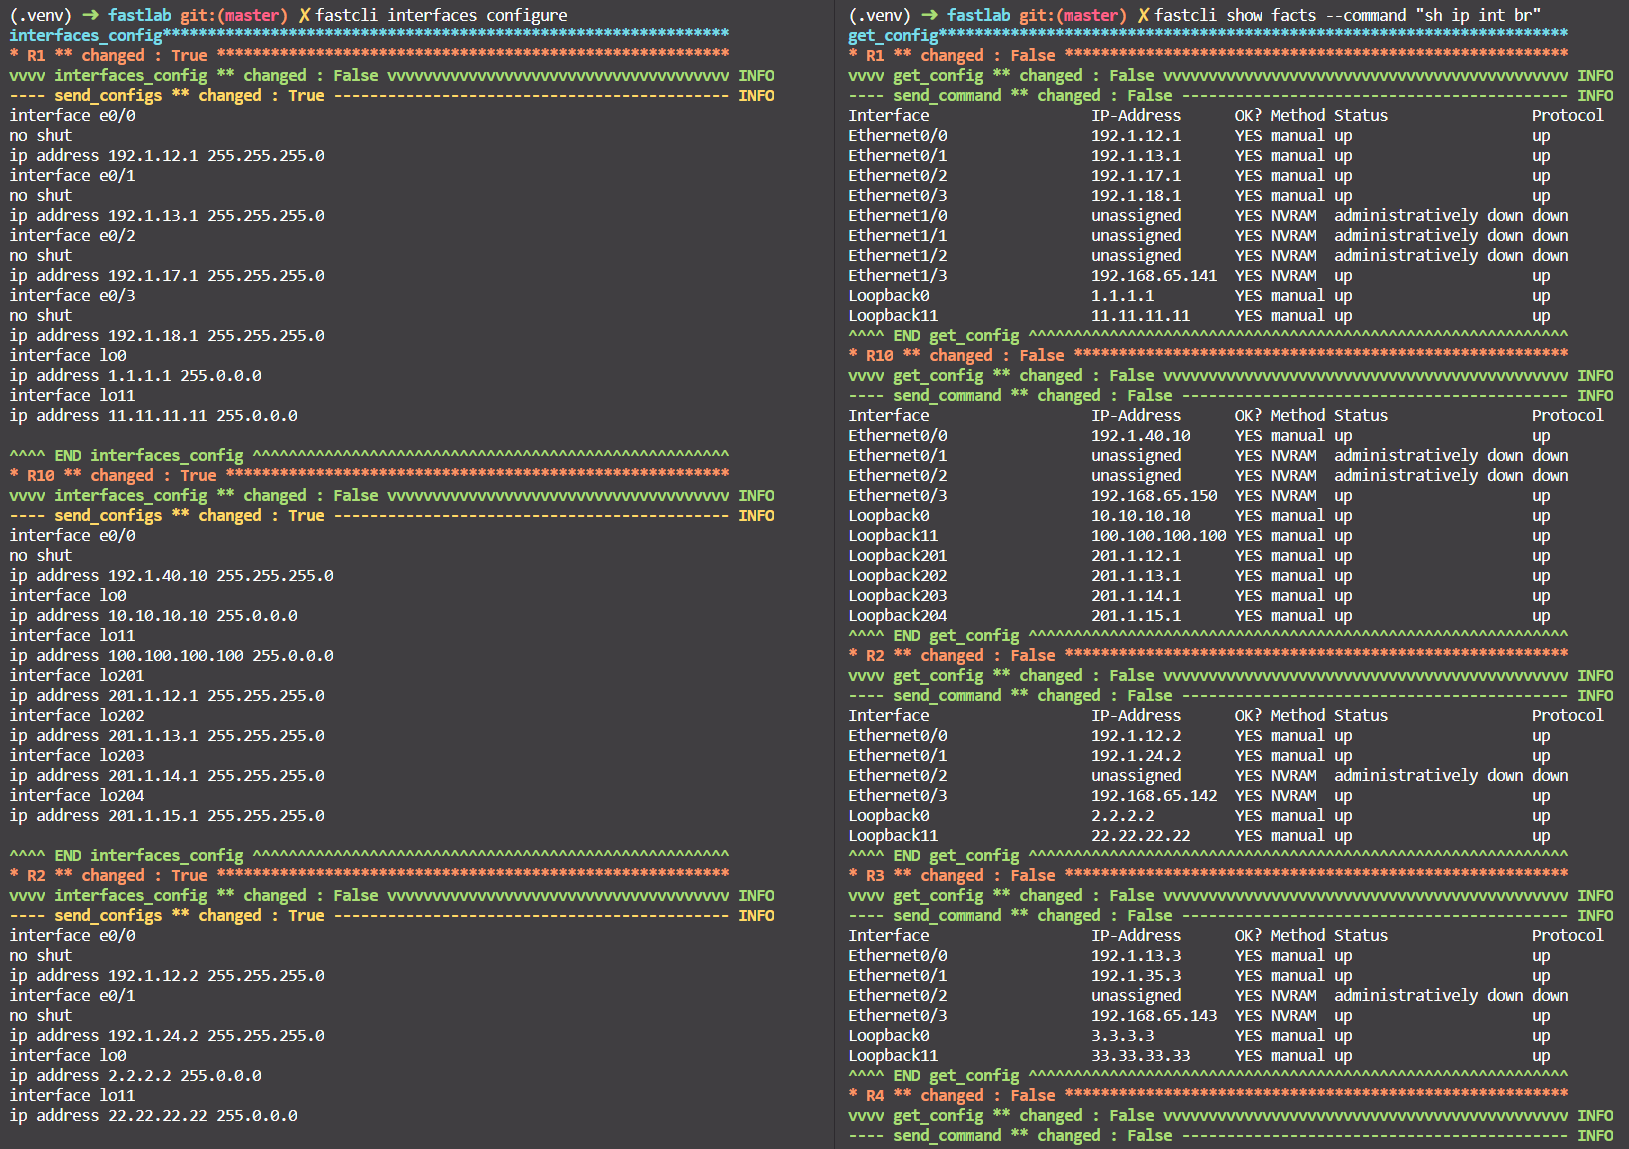
inventory/bgp/hosts.yamldepends on new topology. - Configure interfaces:
fastcli interfaces configure. - Check the interfaces configuration with
fastcli show facts --command "sh ip int br".
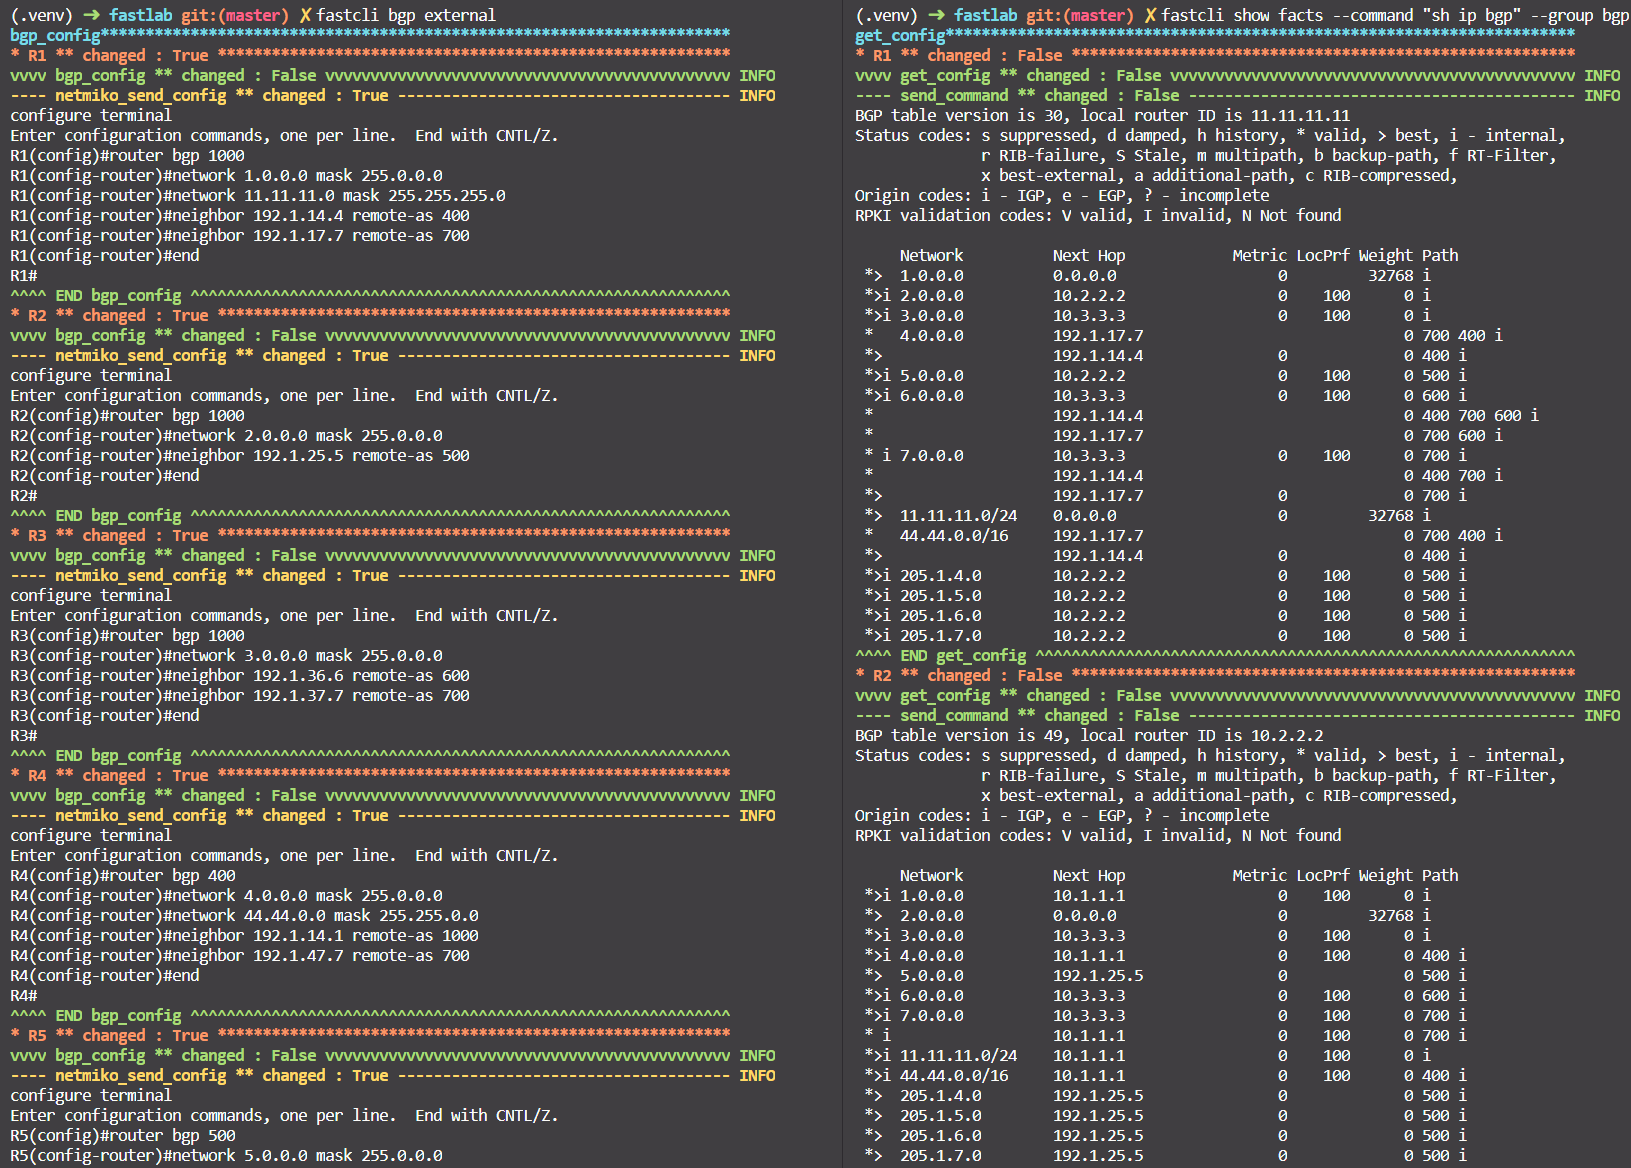
- Configure eBGP with
fastcli bgp external. - Check with
fastcli show facts --command "sh ip bgp" --group bgp
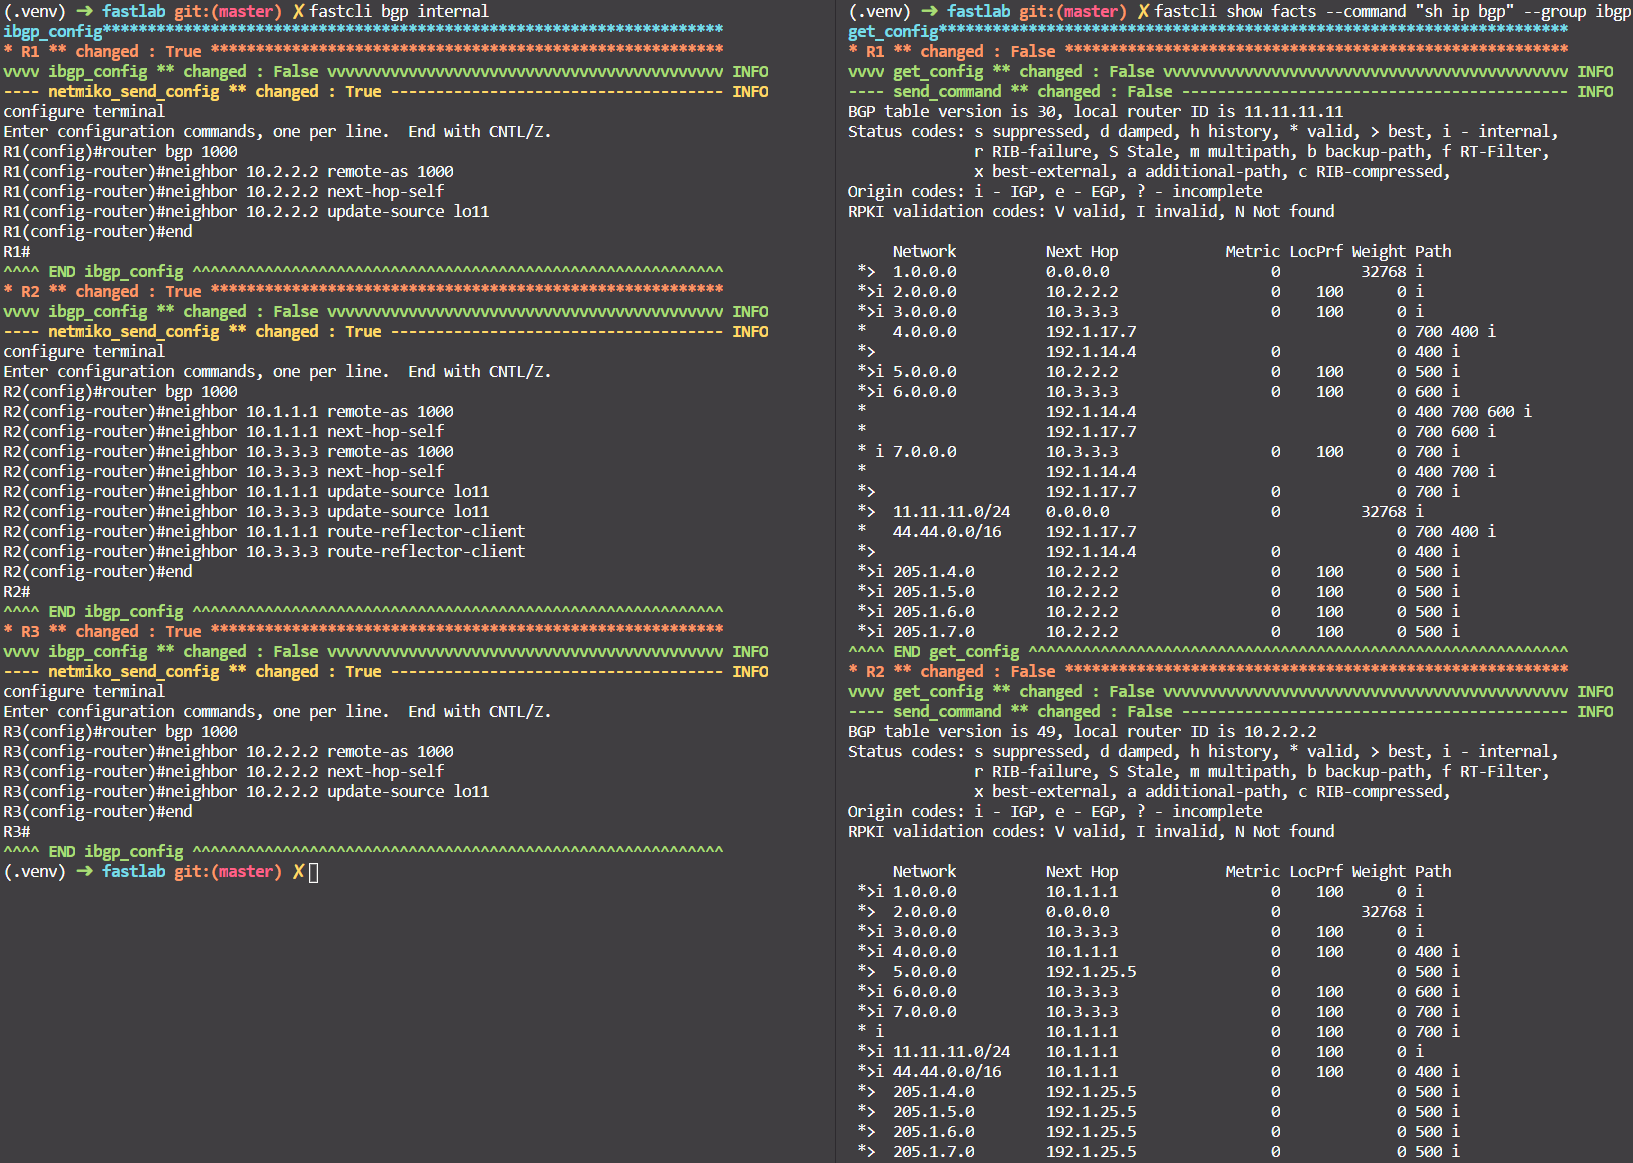
- Configure iBGP with
fastcli bgp internal. - Check with
fastcli show facts --command "sh ip bgp" --group ibgp
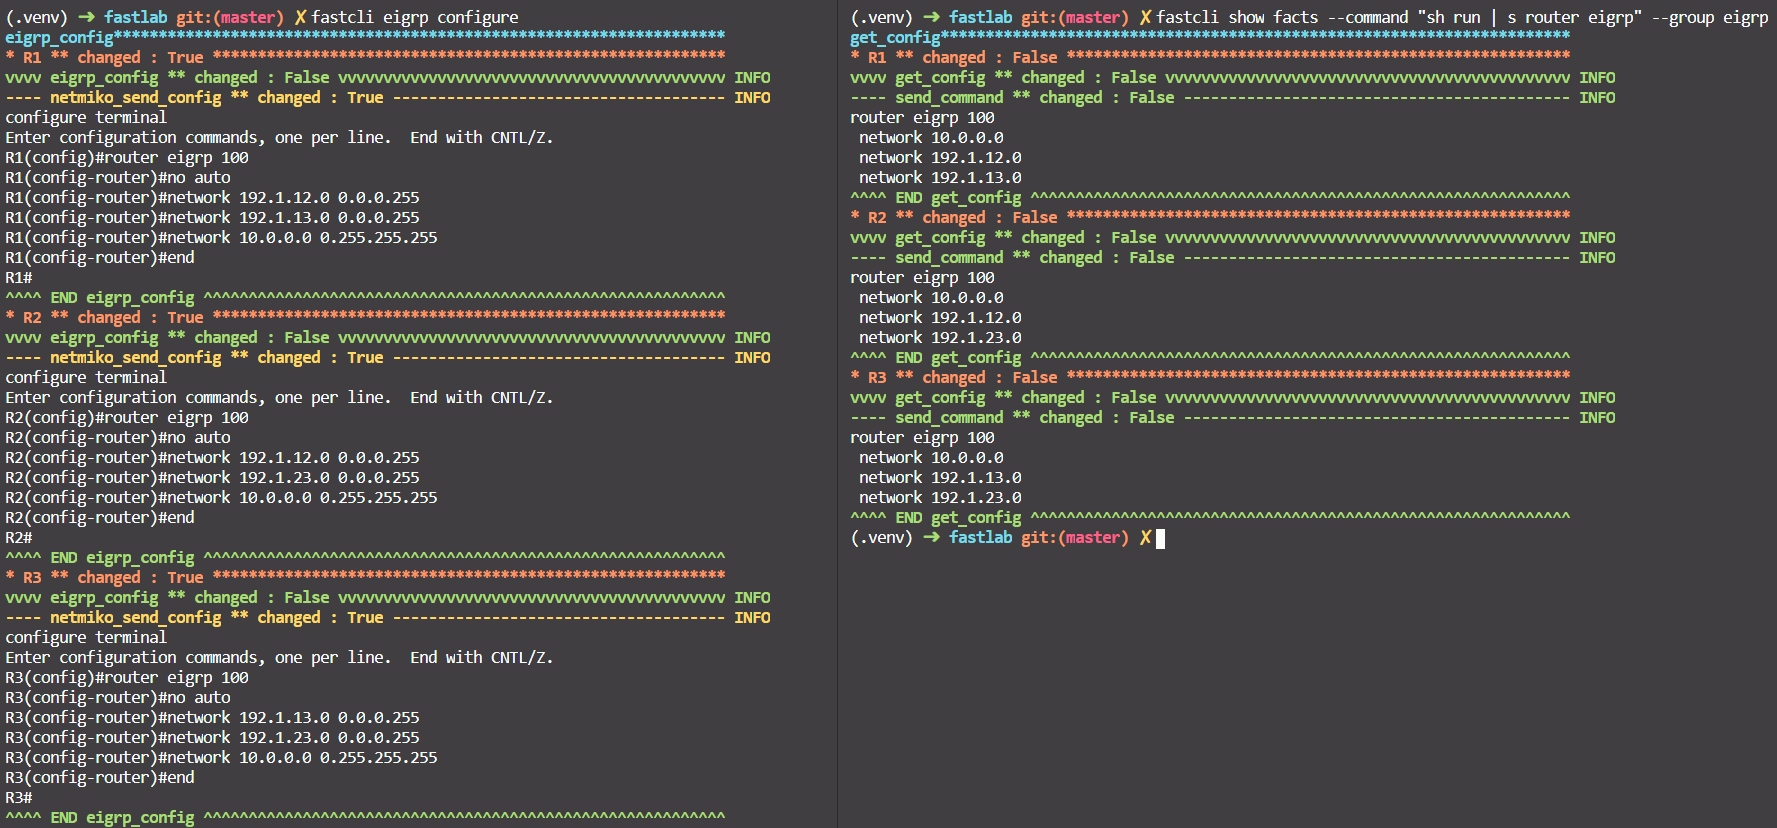
- Configure EIGRP with
fastcli eigrp configure. - Check with
fastcli show facts --command "sh run | s router eigrp" --group eigrp
3.2. Topology 2: OSPF-EIGRP-RIP configuration
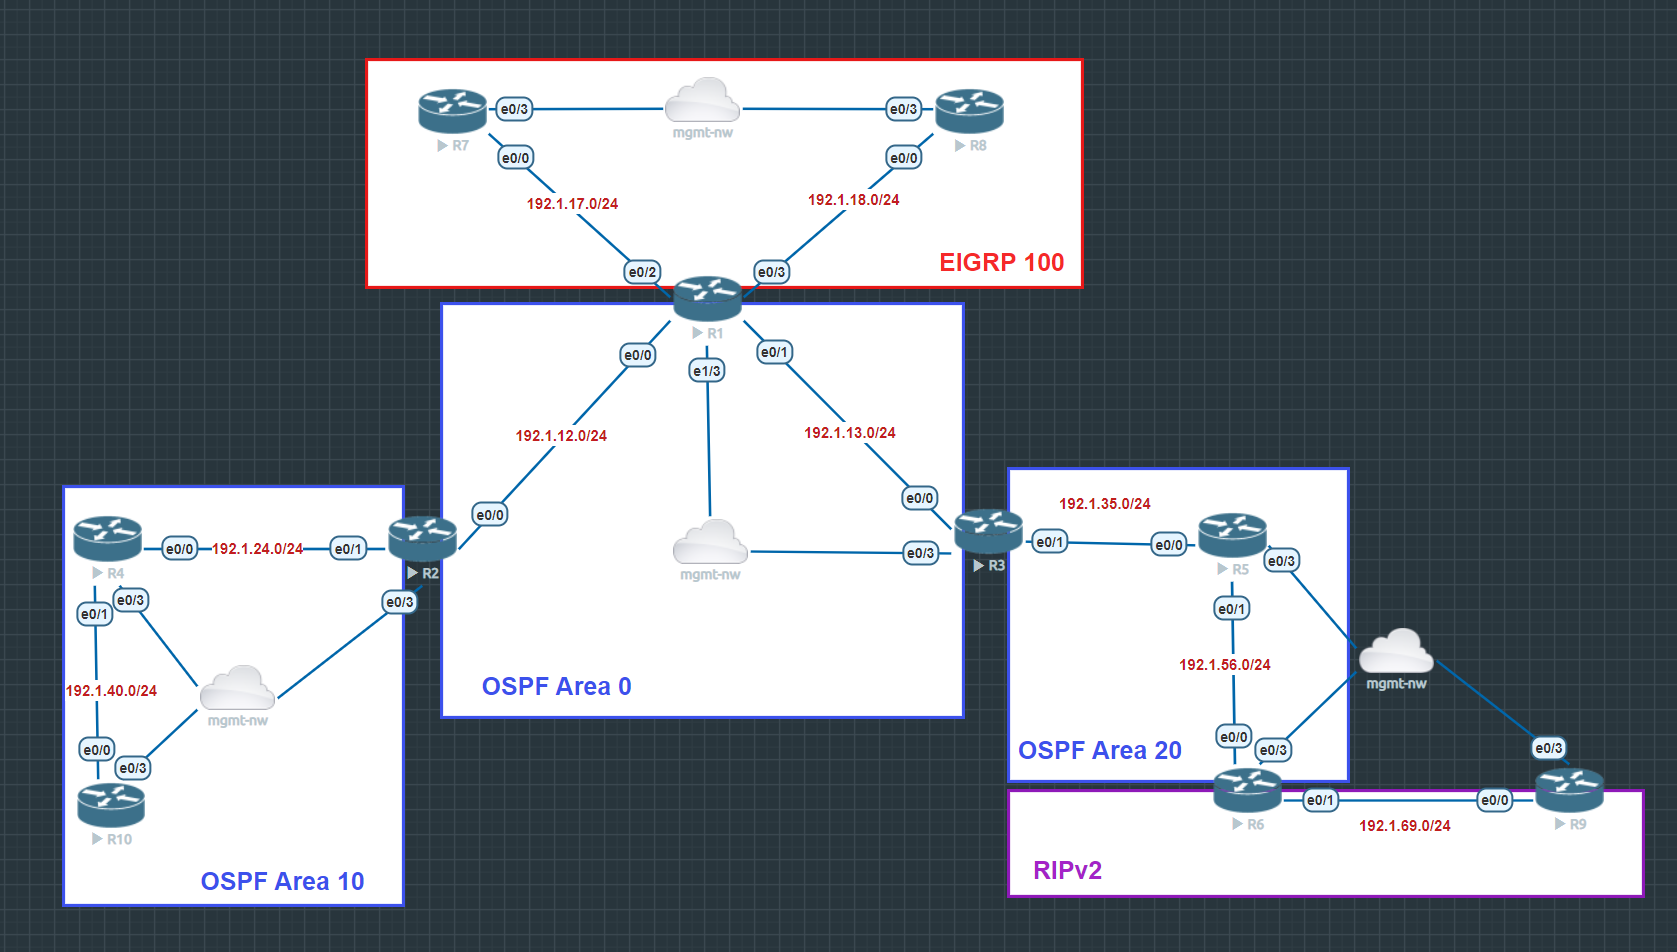
Configuration files under inventory/ospf-eigrp-rip folder.
Steps:
- Check the config_file variable in
constants.pyconfig_file = "inventory/ospf-eigrp-rip/config.yaml" - Check the paths of
host_file,group_file,defaults_fileinconfig.yaml. - Change configurations in
inventory/ospf-eigrp-rip/hosts.yamldepends on new topology. - Configure interfaces:
fastcli interfaces configure. - Check the interfaces configuration with
fastcli show facts --command "sh ip int br".
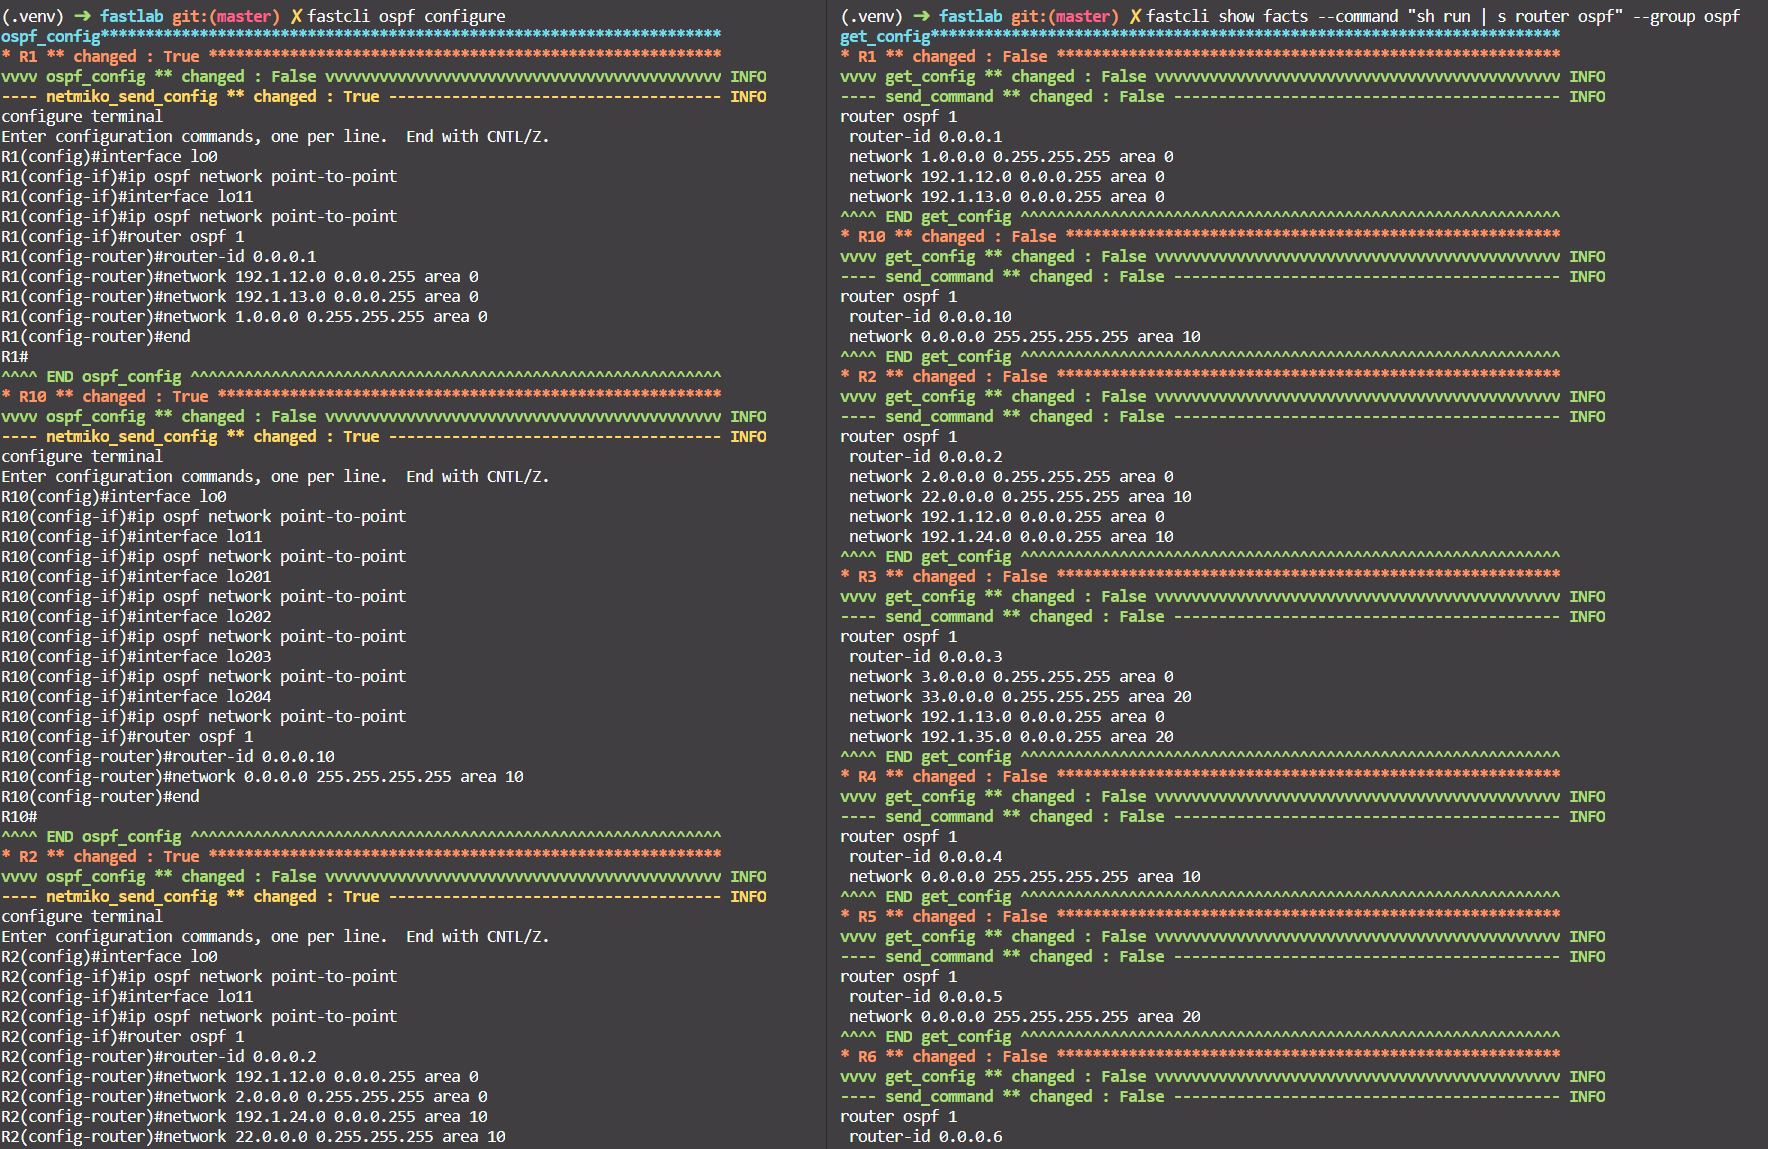
- Configure OSPF with
fastcli ospf configure. - Check with
fastcli show facts --command "sh run | s router ospf" --group ospf
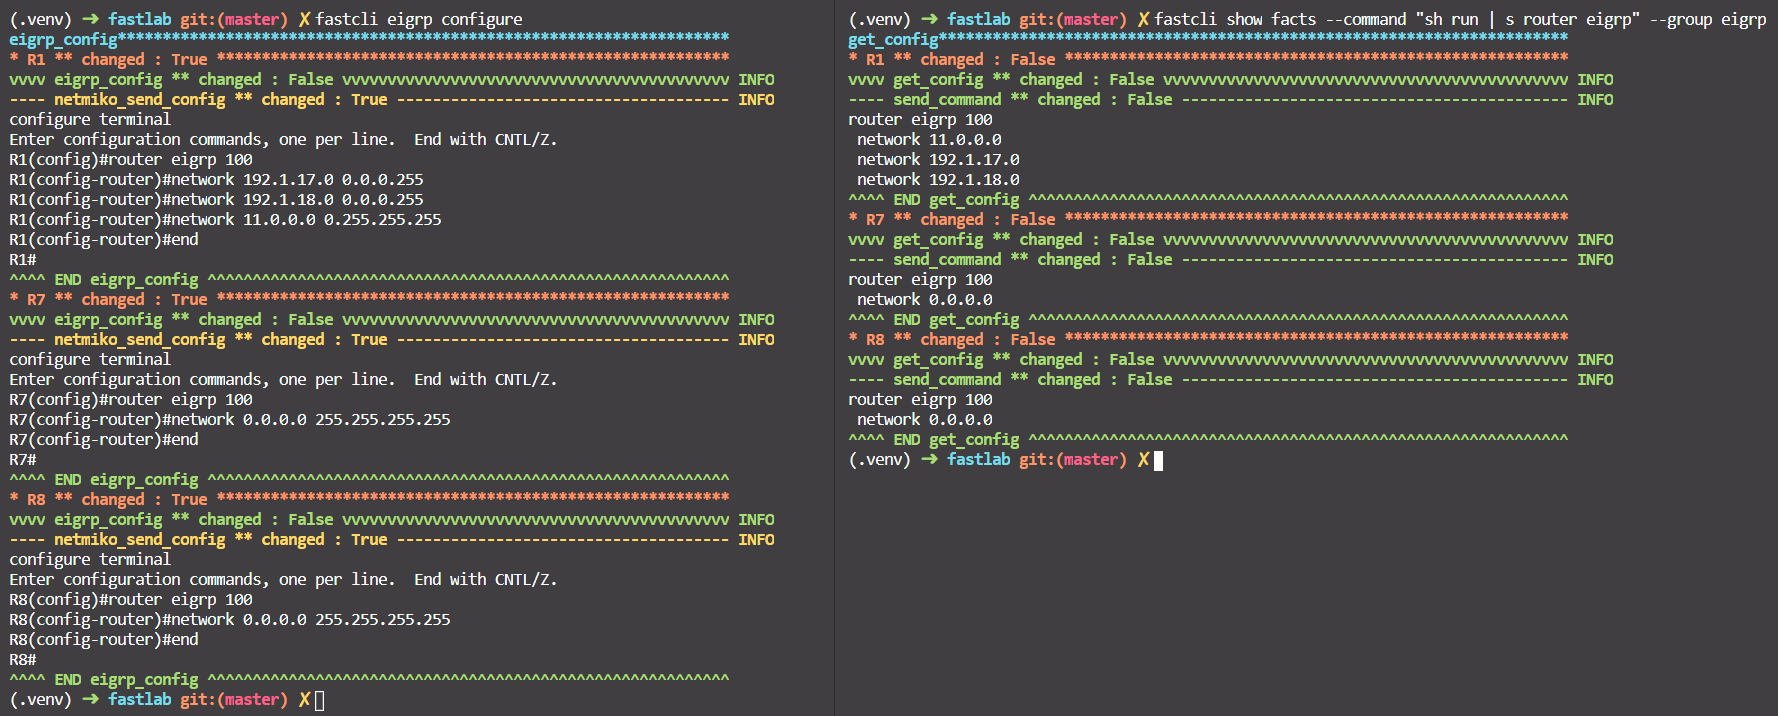
- Configure EIGRP with
fastcli eigrp configure. - Check with
fastcli show facts --command "sh run | s router eigrp" --group eigrp
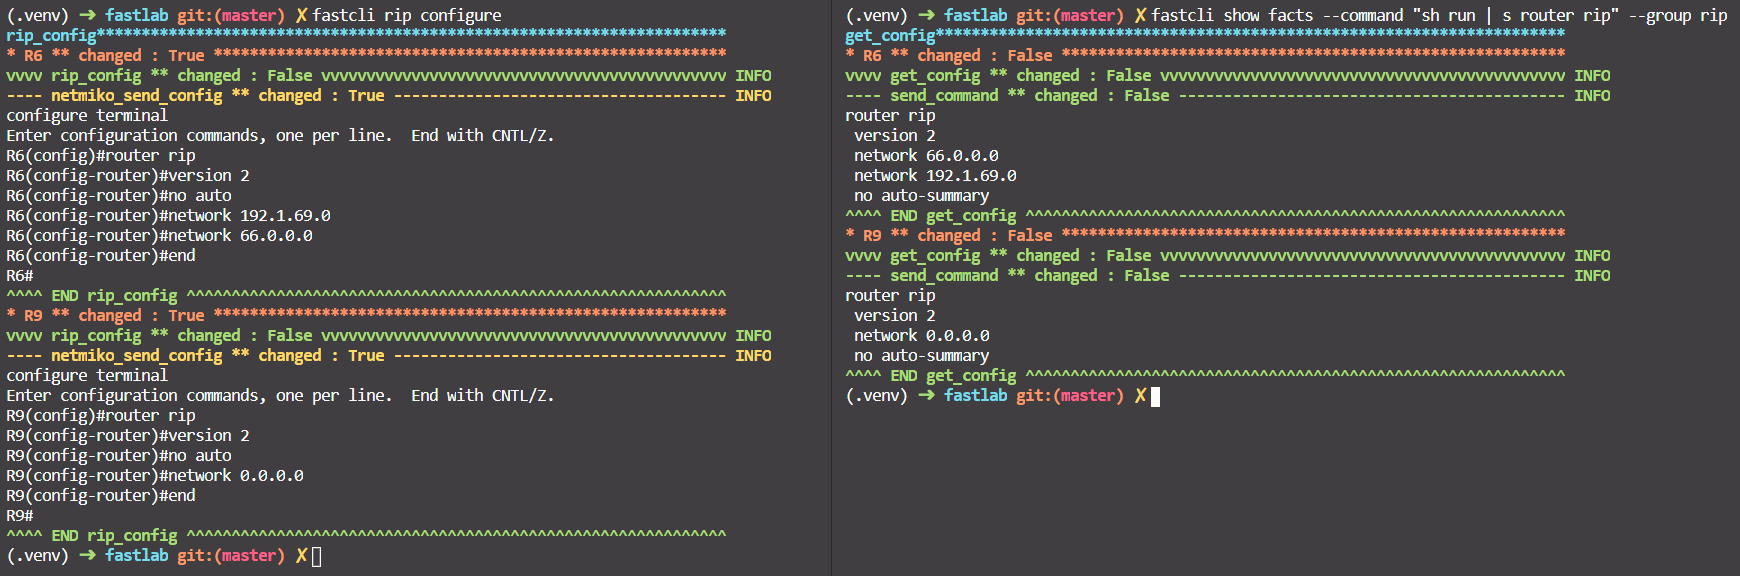
- Configure RIP with
fastcli rip configure. - Check with
fastcli show facts --command "sh run | s router rip" --group rip
4. Conclusion
Using this tool helps me a lot to spinning up the lab, especially for the interfaces
configuration. Whenever I want a new lab, I just copy the full folder under inventory,
for example, the inventory/bgp folder, then start modifying from there. I will continue
to add functions to this fastcli tool for MPLS VPN configuration, DMVPN, etc …
Comments