vManage REST APIs - Cisco SD-WAN 20.3.1 and building the SDWANCLI
Updated:
In this post, we will explore the vManage REST APIs, and use python requests module to
interact with vManage for extracting some useful information, including list of devices in
our SD-WAN system, list of device templates. We can also make changes to the configuration
of SLA Class, template using python. Finally, we make the python scripts as a sdwancli by
using python click module. This sdwancli is published in CiscoDevnet CodeExchange.

Or you can find it originally on my Github repo.
1. vManage REST APIs basics
There are some excellent materials from Cisco DevNet that can help you get started with the vManage REST APIs. I highly recommend looking at these resources first.
The vManage REST API library and documentation are bundled with and installed on the vManage web application software. To access the API documentation from a web browser, use this URL:
https://ip-address:port/apidocs
ip-address is the IP address of the vManage server, and port is the port used for the vManage server, could be either 8443 or 8444.
Since I reinstalled the SD-WAN lab on the new host machine, the vManage server now has
the ip-address of 192.168.148.129 (changed from 192.168.134.138 on the old machine).
In our lab, the vManage web server has the URL https://192.168.148.129:8444. We can access the
vManage REST API at https://192.168.148.129:8444/apidocs.
2. Click setup
Our project has the following structure:
├── LICENSE
├── poetry.lock
├── pyproject.toml
├── README.md
├── requirements.txt
├── sdwancli.py
├── sdwan-test.py
└── vmanage
    ├── authenticate.py
    ├── bfd.py
    ├── constants.py
    ├── device.py
    ├── ipsec.py
    ├── omp.py
    ├── sla.py
    ├── template.py
    └── utils.py
We use click group function to group multiple commands together. And groups can be nested.
We separate the group into modules and import them on the sdwancli.py file. We next add them
to the cli group using the add_command. Our main sdwancli is defined in
sdwancli.py file as follows:
import click
from vmanage.device import cli_device
from vmanage.template import cli_template
from vmanage.bfd import cli_bfd
from vmanage.sla import cli_sla
from vmanage.omp import cli_omp
from vmanage.ipsec import cli_ipsec

@click.group()
def cli():
    """Command line tool to interact with CISCO SDWAN vManage.
    """
    pass


cli.add_command(cli_device)
cli.add_command(cli_template)
cli.add_command(cli_bfd)
cli.add_command(cli_sla)
cli.add_command(cli_omp)
cli.add_command(cli_ipsec)
Each command has subcommands, for example in the file vmanage/sla.py, we group all SLA
subcommands under the cli_sla command and name it as sla.
@click.group(name="sla")
def cli_sla():
    """Commands for managing SLA Class: list, create, edit, delete
    """
    pass


@cli_sla.command(name="list", help="Get list of SLA Classes")

@cli_sla.command(name="create", help="Create a SLA Class")
@click.option("--name", help="name of the SLA Class")
@click.option("--description", help="description of the SLA Class")
@click.option("--loss", help="loss 0 - 100 %")
@click.option("--latency", help="latency 1 - 1000 ms")
@click.option("--jitter", help="jitter 1 - 1000 ms")
With this setting, we can run our commands like:
python sdwancli.py sla list
python sdwancli.py sla create --name "Video-Games3" --description "videogame 3" --loss 1 --latency 20 --jitter 5
We can access the help of each subcommand to know about the arguments using
python sdwancli.py {command} {subcommand} --help, for example:
-> % python sdwancli.py sla create --help
Usage: sdwancli.py sla create [OPTIONS]

  Create a SLA Class

Options:
  --name TEXT         name of the SLA Class
  --description TEXT  description of the SLA Class
  --loss TEXT         loss 0 - 100 %
  --latency TEXT      latency 1 - 1000 ms
  --jitter TEXT       jitter 1 - 1000 ms
  --help              Show this message and exit.
3. vManage server information and Authentication
The environment is pre-configured to access my local SD-WAN lab in GNS3. The vManage information
is stored in the vmanage/constants.py file as follows:
vmanage = {
    "host": "192.168.148.129",
    "port": "8443",
    "username": "admin",
    "password": "admin"
}
You can edit the variables in the vmanage/constants.py to point to your own vManage
instance, the AlwaysOn SDWAN Sandbox, or the Reservable SDWAN Sandbox.
Note: When you use the AlwaysOn Sandbox, you do not have permission to perform
some commands such as edit, create, delete.
4. Develop the first sla list command
4.1. Which API to use?
Let’s open a browser and navigate to our vManage REST APIs documentation at:
https://192.168.148.129:8444/apidocs.
The first question we need to ask is which API and which HTTP operation (GET/PUT/POST/DELETE) we use to list the SLA Class. The HTTP operation is easy, we need to use GET operation.
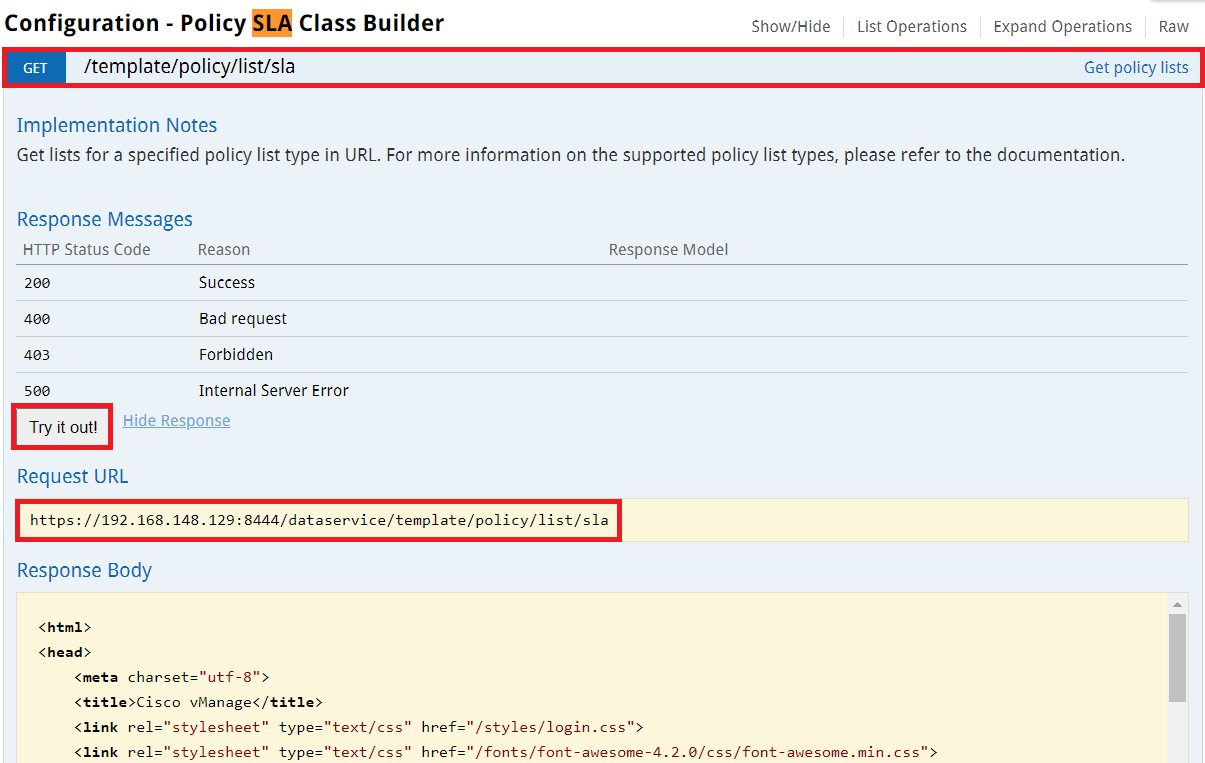
However, for the API, vManage supports quite a lot of functionalities. Let’s search in the
browser for the keyword SLA. Here it is, Configuration - Policy SLA Class Builder is the
group of APIs that we should pay attention to.

Keep exploring, right there, the first API and also the HTTP operation
GET: /template/policy/list/sla. Try it out!
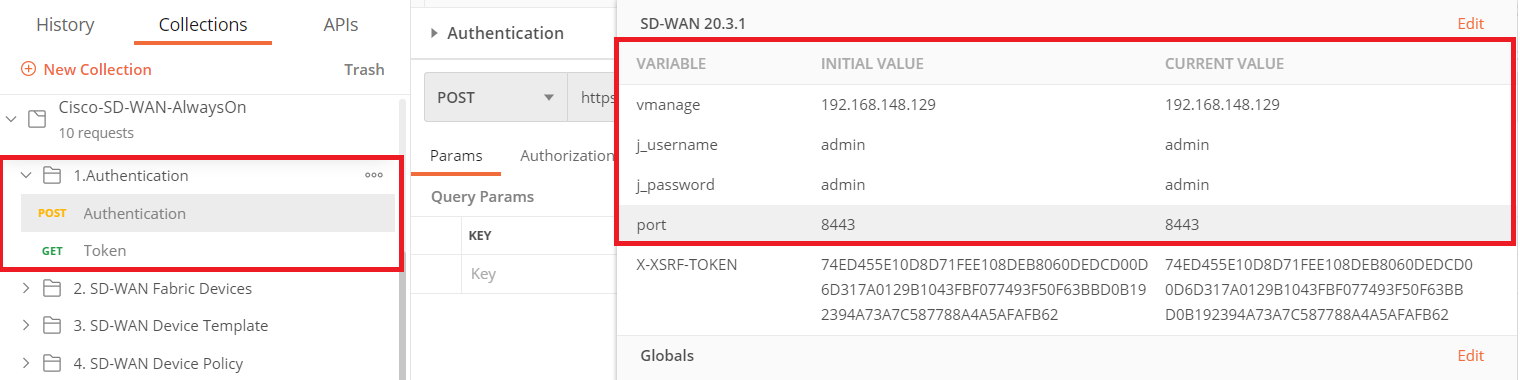
Now, we may face the error since we run directly our GET command without authentication with the vManage. However, we can download the Postman-for-AlwaysOn-Cisco-SD-WAN collection to help us authenticate with the vManage server. We also should create a new SD-WAN environment with our vManage server information.
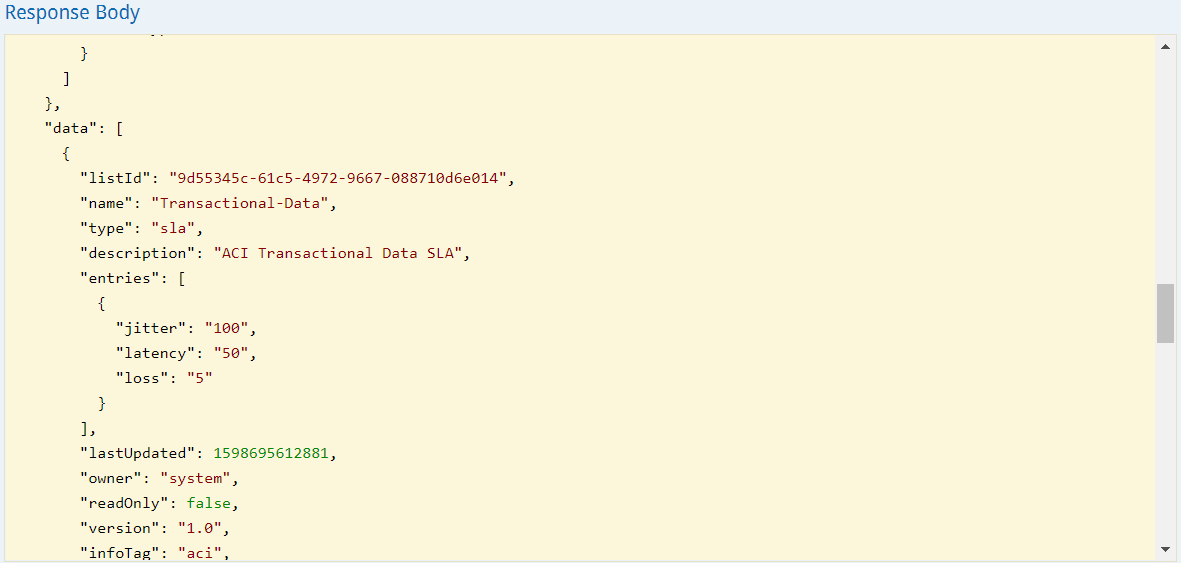
Now, run again the Try it out! in the vManage REST APIs documentation interface, the response should look like this.
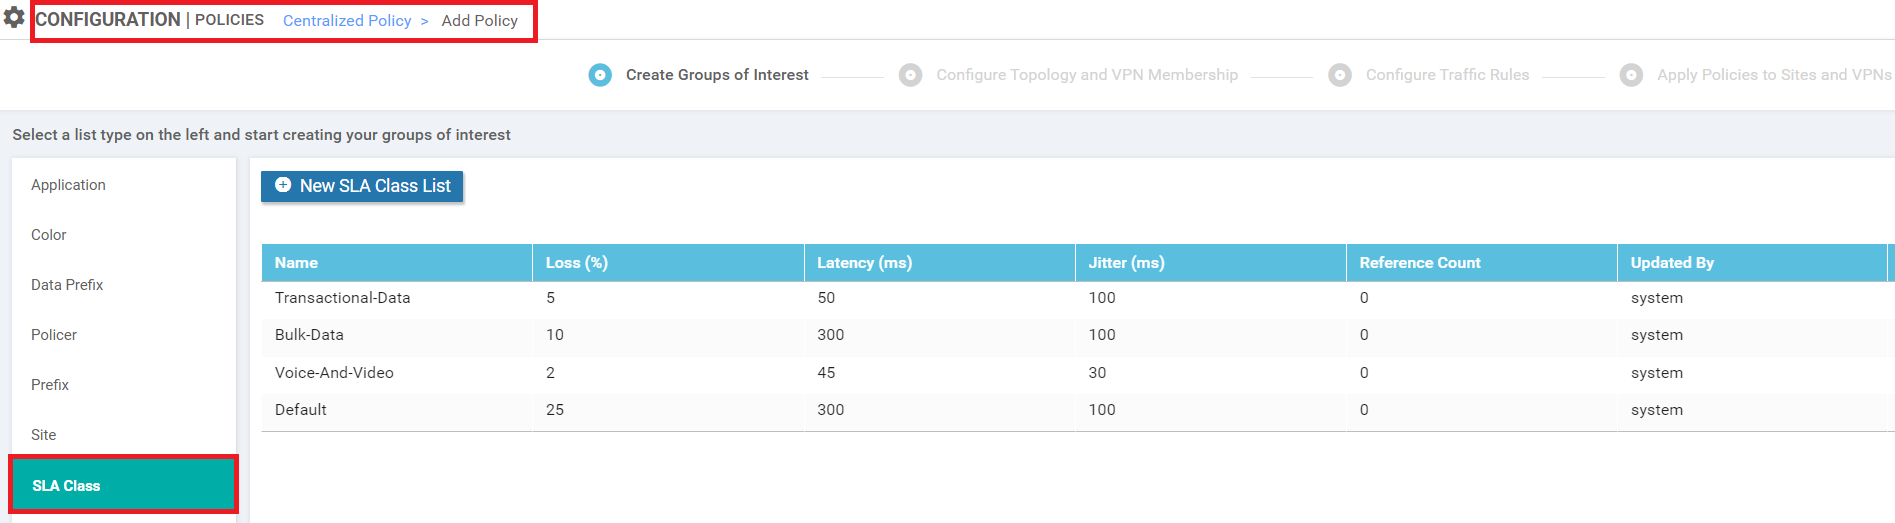
4.2. How vManage Web Interface display this?
So in the previous step, we can get back the SLA list in json format. We may want to
present this list in table format. Let’s take a look at the SLA list in the vManage Web
Interface.
We go to Configuration > Policies > Centralized Policy > Add a policy > Select SLA Class,
to see this table.
4.3. Start developing sla list with python
sla_list function
Now, we have all information we need:
- The API:
/template/policy/list/sla - The HTTP operation:
GET - Output: Table format as in vManage Web Interface or we can customize as we like.
- We use python
richmodule to formulate and color to have pretty table.
The function looks like this:
@cli_sla.command(name="list", help="Get list of SLA Classes")
def sla_list():
    headers = authentication(vmanage)
    base_url = "https://" + f'{vmanage["host"]}:{vmanage["port"]}/dataservice'
    api = "/template/policy/list/sla"
    url = base_url + api
    response = requests.get(url=url, headers=headers, verify=False)
    if response.status_code == 200:
        items = response.json()['data']
    else:
        print("Error:: " + str(response.text))
        exit()
    console = Console()
    table = Table(
        "Name", "Loss (%)", "Latency (ms)", "jitter (ms)", "Reference Count",
        "Updated by", "SLA ID", "Last Updated")

    for item in items:
        # breakpoint()
        time_date = datetime.datetime.fromtimestamp(
            item["lastUpdated"]/1000).strftime('%c')
        table.add_row(f'[green]{item["name"]}[/green]',
                      f'[blue]{item["entries"][0]["loss"]}[/blue]',
                      f'[magenta]{item["entries"][0]["latency"]}[/magenta]',
                      f'[cyan]{item["entries"][0]["jitter"]}[/cyan]',
                      f'[orange1]{item["referenceCount"]}[/orange1]',
                      f'[bright_green]{item["owner"]}[/bright_green]',
                      f'[magenta]{item["listId"]}[/magenta]',
                      f'[yellow]{time_date}[/yellow]')
    console.print(table)
First, we authenticate with vManage using authentication(vmanage). It will return
the headers that we can put in the requests.get(url=url, headers=headers, verify=False).
We receive the response that is exactly as we see with the Try it out! step.
Output of the request call
The response is as follows:
"data": [
    {
      "listId": "9d55345c-61c5-4972-9667-088710d6e014",
      "name": "Transactional-Data",
      "type": "sla",
      "description": "ACI Transactional Data SLA",
      "entries": [
        {
          "jitter": "100",
          "latency": "50",
          "loss": "5"
        }
      ],
      "lastUpdated": 1598695612881,
      "owner": "system",
      "readOnly": false,
      "version": "1.0",
      "infoTag": "aci",
      "referenceCount": 0,
      "references": [],
      "isActivatedByVsmart": false
    },
    {
      "listId": "63c0f996-7cc3-407e-9a75-7f6b6a176980",
      "name": "Bulk-Data",
      "type": "sla",
      "description": "ACI Bulk Data SLA",
      "entries": [
        {
          "jitter": "100",
          "latency": "300",
          "loss": "10"
        }
      ],
      "lastUpdated": 1598695613341,
      "owner": "system",
      "readOnly": false,
      "version": "1.0",
      "infoTag": "aci",
      "referenceCount": 0,
      "references": [],
      "isActivatedByVsmart": false
    },
    {
      "listId": "c6ea38b8-38d0-430b-b576-c582f504f383",
      "name": "Voice-And-Video",
      "type": "sla",
      "description": "ACI Voice And Video SLA",
      "entries": [
        {
          "jitter": "30",
          "latency": "45",
          "loss": "2"
        }
      ],
      "lastUpdated": 1598695612247,
      "owner": "system",
      "readOnly": false,
      "version": "1.0",
      "infoTag": "aci",
      "referenceCount": 0,
      "references": [],
      "isActivatedByVsmart": false
    },
    {
      "listId": "d81de142-24fa-492d-b62c-109310ac829d",
      "name": "Default",
      "type": "sla",
      "description": "ACI Default SLA",
      "entries": [
        {
          "jitter": "100",
          "latency": "300",
          "loss": "25"
        }
      ],
      "lastUpdated": 1598695612067,
      "owner": "system",
      "readOnly": false,
      "version": "1.0",
      "infoTag": "aci",
      "referenceCount": 0,
      "references": [],
      "isActivatedByVsmart": false
    }
  ]
There are four SLA classes that are defined by default in our SD-WAN system.
- ACI Transactional Data SLA
- ACI Bulk Data SLA
- ACI Voice And Video SLA
- ACI Default SLA
For each class, it is a dictionary
dict_keys(['listId', 'name', 'type', 'description', 'entries', 'lastUpdated', 'owner', 'readOnly', 'version', 'infoTag', 'referenceCount', 'references', 'isActivatedByVsmart']).
Now, we just need to format it in a table using rich.
Formatting the output with python rich module
First, we define the columns in the table, including: Name, Loss (%), Latency (ms),
jitter (ms), Reference Count, and so on.
For each row, we color the information with different colors.
console = Console()
table = Table(
    "Name", "Loss (%)", "Latency (ms)", "jitter (ms)", "Reference Count",
    "Updated by", "SLA ID", "Last Updated")

for item in items:
    # breakpoint()
    time_date = datetime.datetime.fromtimestamp(
        item["lastUpdated"]/1000).strftime('%c')
    table.add_row(f'[green]{item["name"]}[/green]',
                  f'[blue]{item["entries"][0]["loss"]}[/blue]',
                  f'[magenta]{item["entries"][0]["latency"]}[/magenta]',
                  f'[cyan]{item["entries"][0]["jitter"]}[/cyan]',
                  f'[orange1]{item["referenceCount"]}[/orange1]',
                  f'[bright_green]{item["owner"]}[/bright_green]',
                  f'[magenta]{item["listId"]}[/magenta]',
                  f'[yellow]{time_date}[/yellow]')
console.print(table)
The output looks good.

5. Conclusion
In this post, we have going through one example to create the sdwancli sla list command.
It’s quite awesome that with a single command we can see the SLA list information, which
takes a lot of steps to figure out in the vManage Web Interface. Also, we can customize
our information as we like.
It’s easy to extend the sdwancli library to include new commands and subcommands. For
example, we can create the omp tlocs or omp tloc-paths following the same steps in
Section 4.
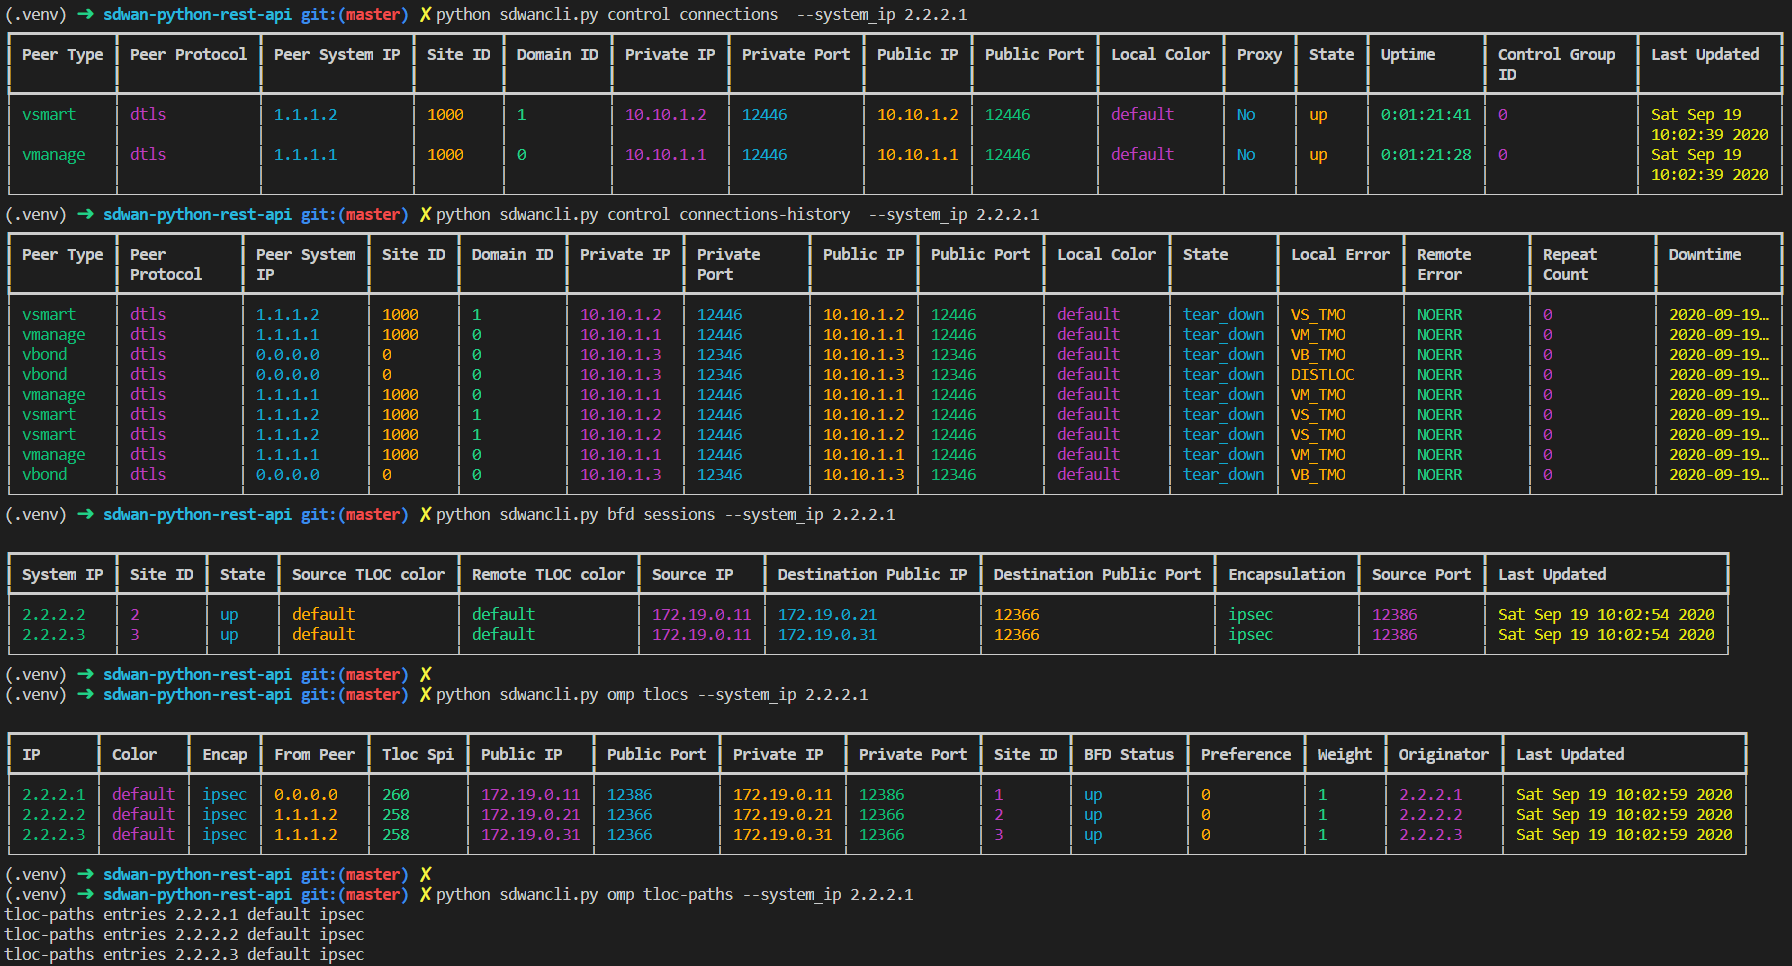
Recently, in RouterGods, Dustin (Cisco Press SD-WAN book author), did a live troubleshooting session for control plane problem when onboarding new WAN Edge to the SD-WAN, I have implemented all the TB commands in my python library.
This table compares the commands on the vEdge and the commands using this sdwancli library.
Moreover, there are some syntax differences between the commands on vEdge and cEdge. But,
with sdwancli, we can just use the same.
| vEdge commands | Sdwancli commands |
|---|---|
| show control connections | python sdwancli.py control connections –system_ip 2.2.2.1 |
| show control connections-history | python sdwancli.py control connections-history –system_ip 2.2.2.1 |
| show bfd sessions | python sdwancli.py bfd sessions –system_ip 2.2.2.1 |
| show omp tlocs | python sdwancli.py omp tlocs –system_ip 2.2.2.1 |
| show omp tloc-paths | python sdwancli.py omp tloc-paths –system_ip 2.2.2.1 |
And here are the results.
Comments